Chapter 3. Git Branching
本章讲解Git分支功能实现的基本原理、merge操作、rebase操作等等
基本思想:snapshot
首先要理解,不同于其它VCS,对于版本之间的提交,Git存储的不是diff,而是snapshot。对于下面这样一次commit,Git会生成5个文件
1 | $ git add README test.rb LICENSE |
生成一个树状结构:98ca9记录了本次commit的信息(committer、date、message等),并有一个指针,指向tree,tree中包含本次commit中改动的全部文件snapshot
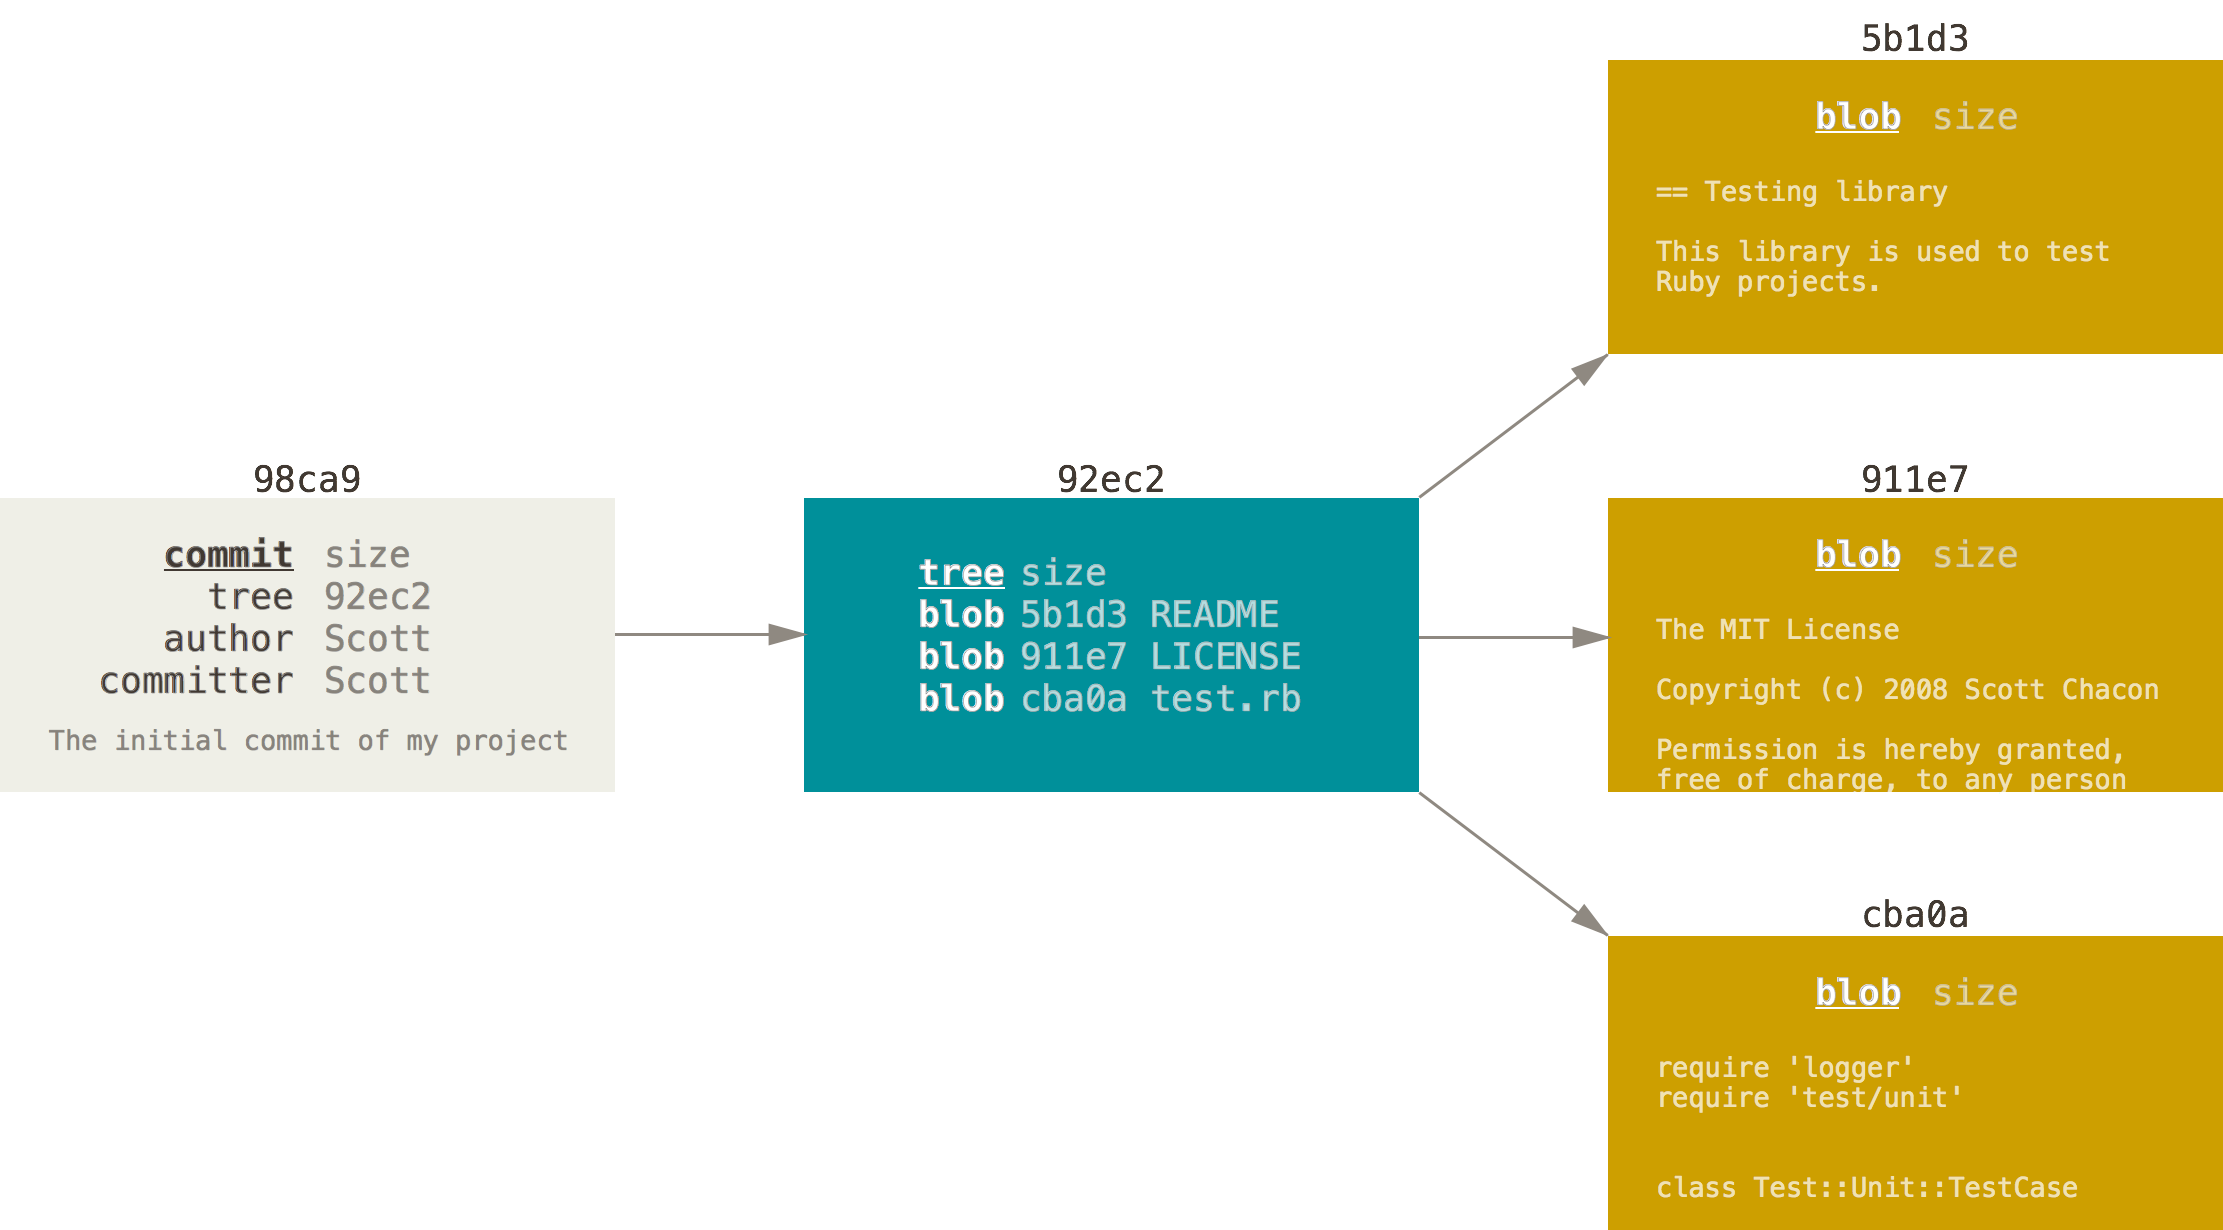
A branch in Git is simply a lightweight movable pointer to one of these commits.
这也就解释了为什么在Git中,创建、删除、切换分支的操作都很快速。
创建分支
Git使用如下命令创建分支
1 | $ git branch testing |
创建后的testing分支,跟master都指向同一个Snapshot
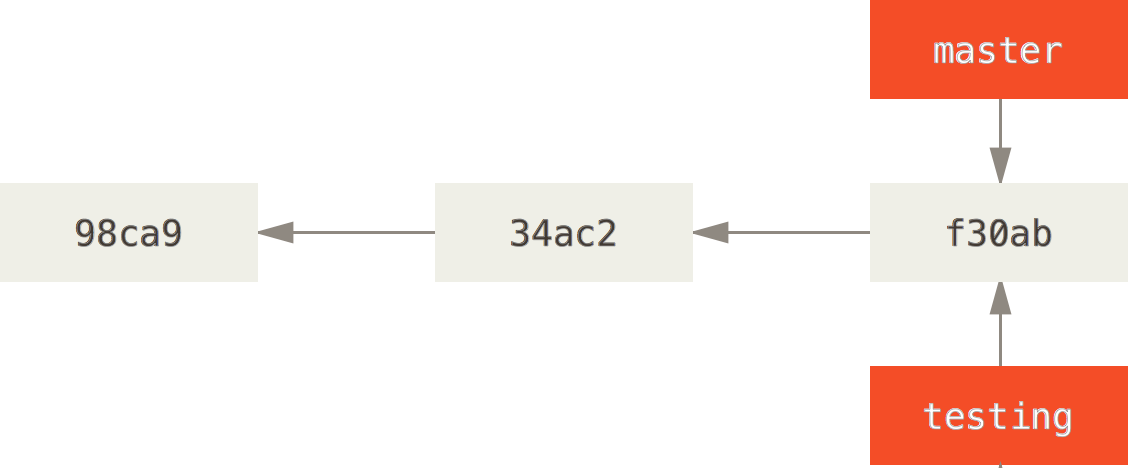
那么Git如何知道当前你在编辑的是哪一个分支呢?用HEAD!例如,在上面的命令后,内部的分支是这样的
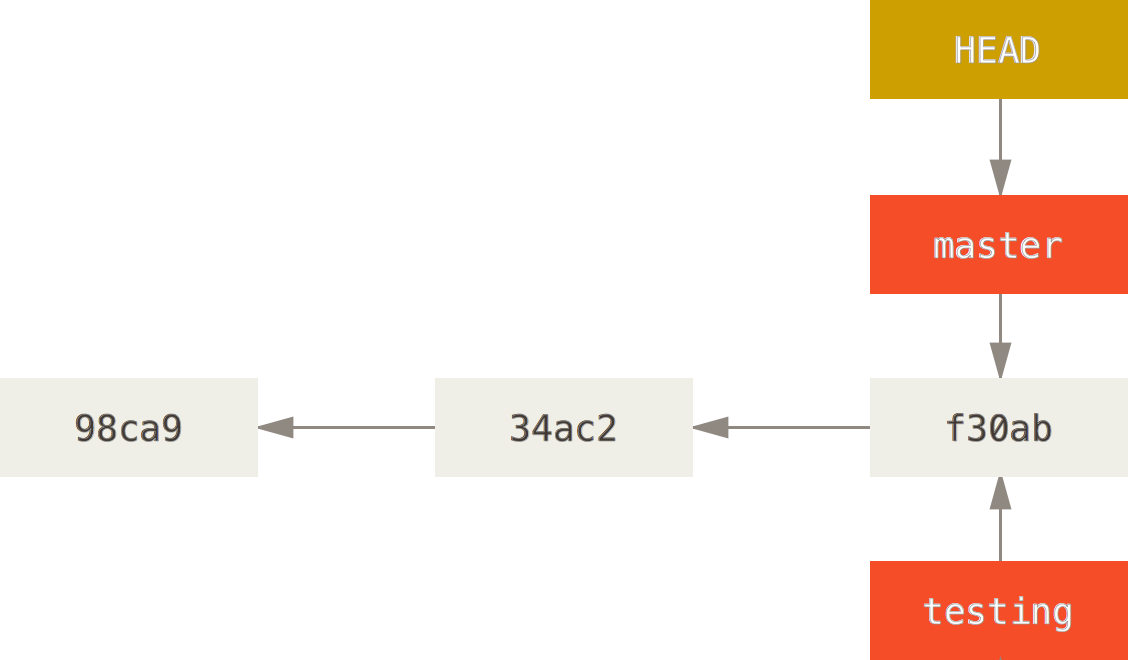
可以在git log中使用--decorate参数来观察当前HEAD分支。(这里推荐一下zsh,自动标示当前HEAD,非常方便)
1 | $ git log --oneline --decorate |
切换分支
使用git checkout [branch_name]来切换分支
1 | $ git checkout master |
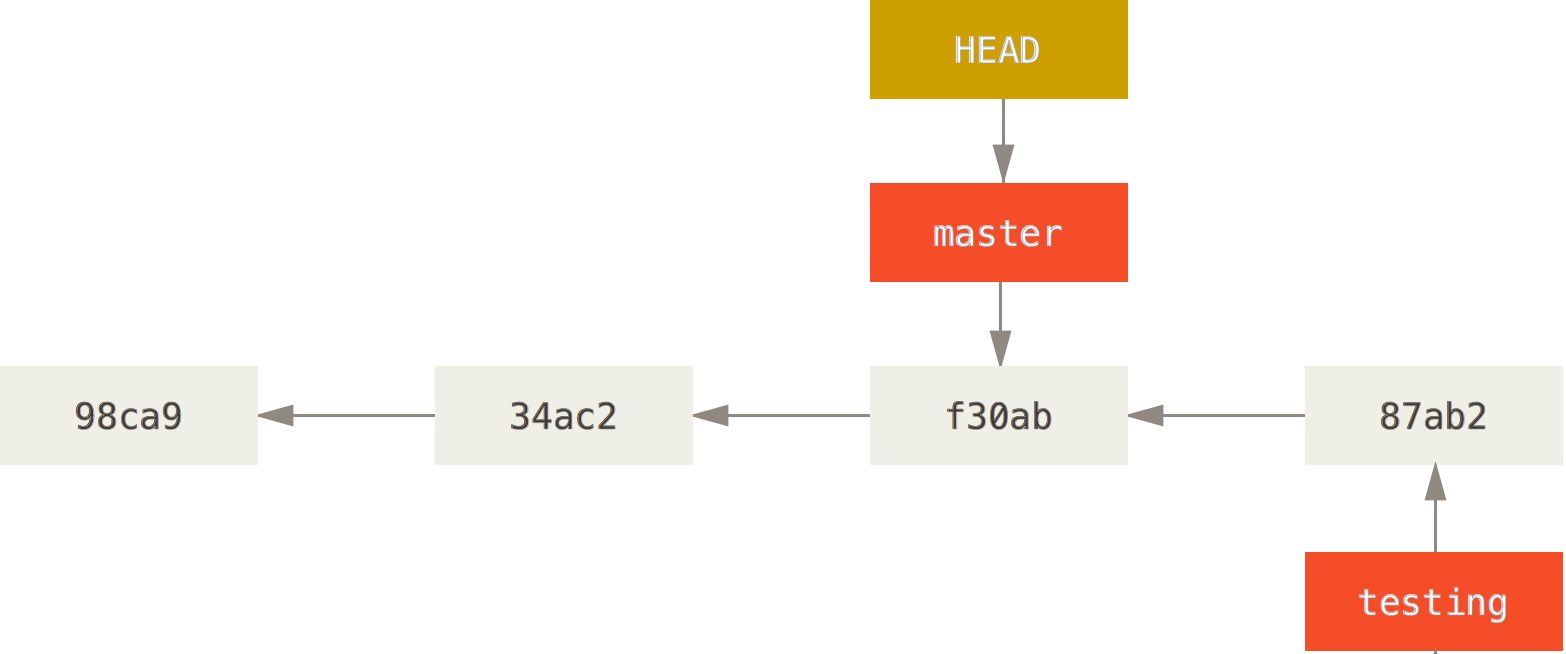
创建&切换分支可以放在一个命令里完成:git checkout -b [branch_name],作用是基于当前HEAD切出一个名为branch_name的新分支,并且将HEAD切换到该新分支上。
Basic Branching and Merging
想象一个比较复杂的分支模型:当你开发某个功能时(iss53),突然线上基于master分支的代码爆出一个bug,此时必须要进行hotfix,并且在完成hotfix后,将hotfix的内容合并回master,最后再切换回iss53分之继续进行功能开发。
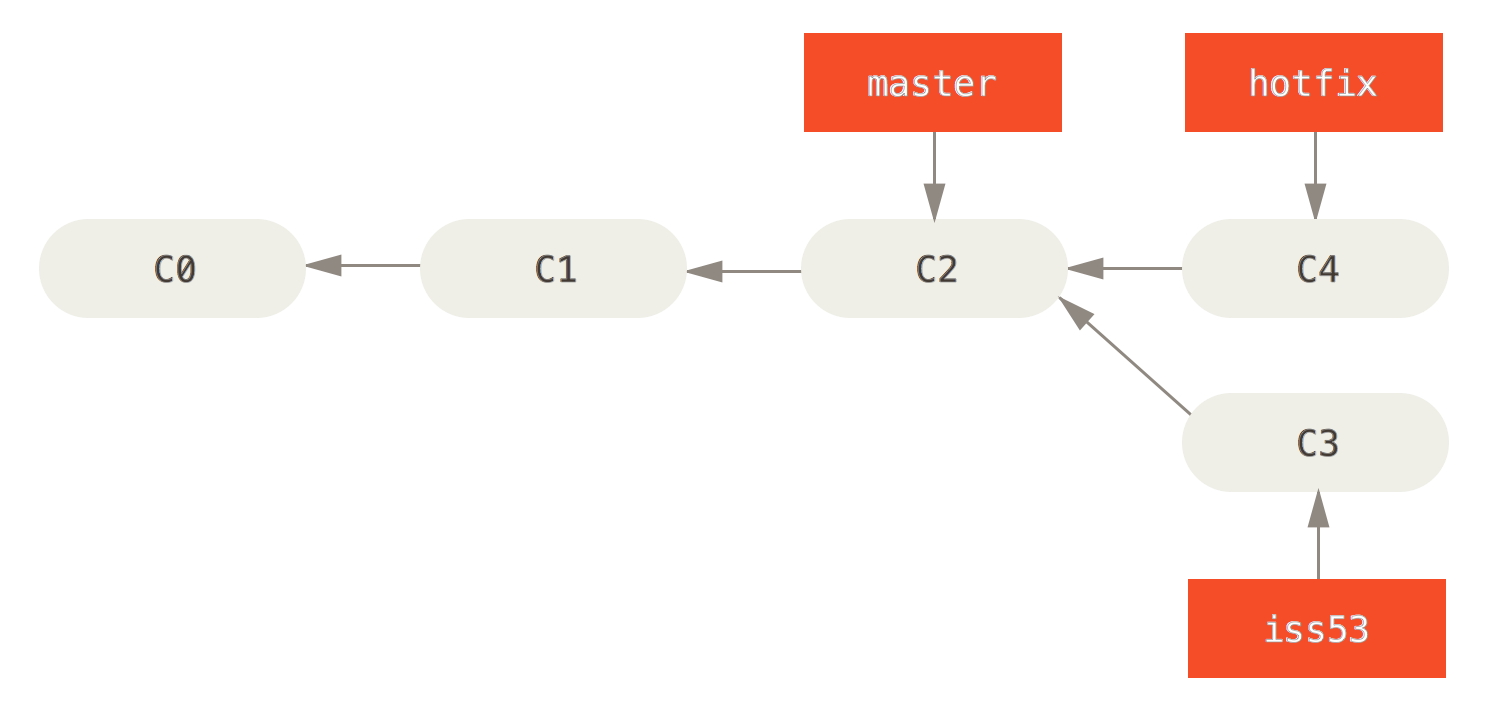
怎样让master合并hotfix呢?切换回master分支,使用git merge hotfix来完成
1 | $ git checkout master |
看到Fast-forward的提示没有?这是说,master的指针已经“向前移动到了hotfix指针所在位置”,如下图:
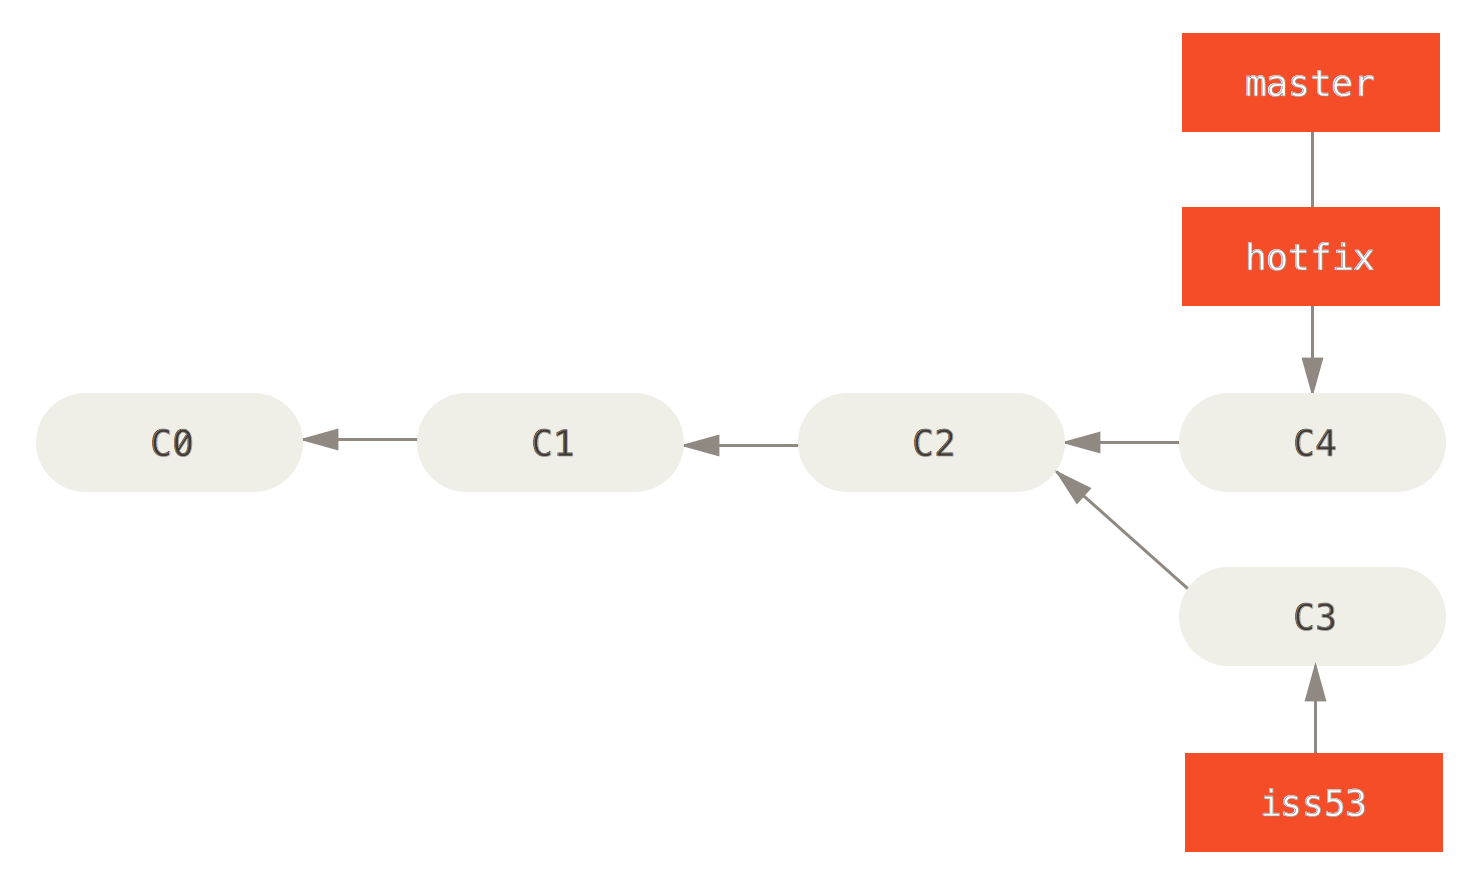
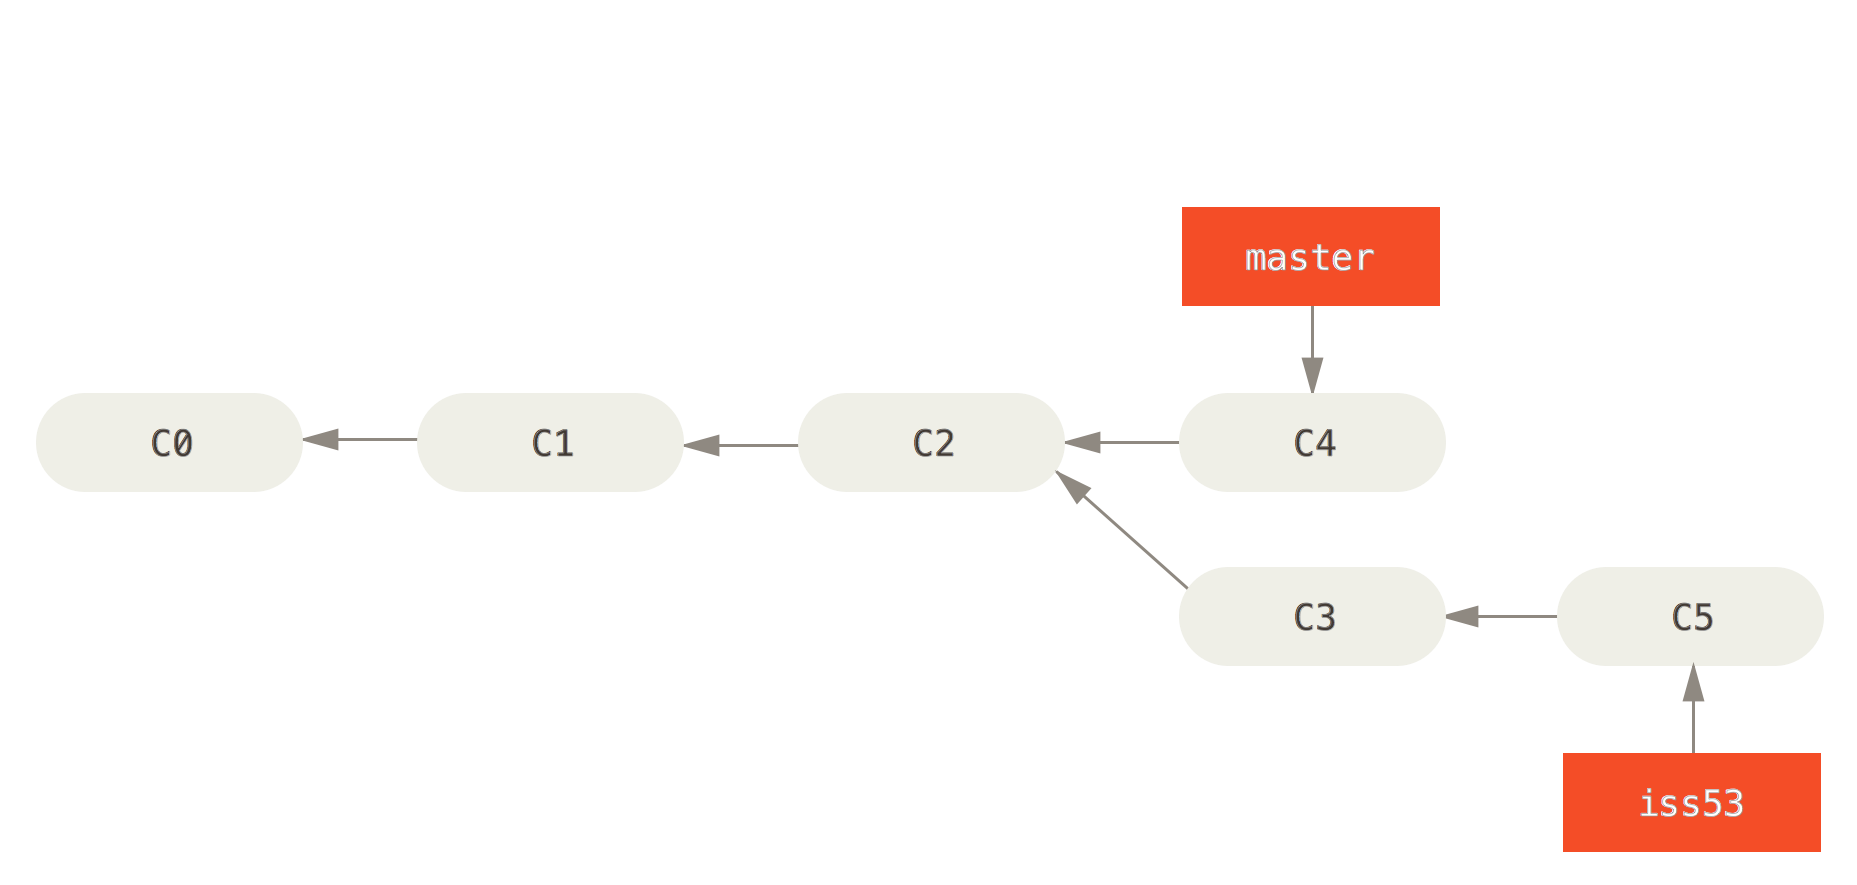
这个时候hotfix已经完成了它的任务,继续留着它只会让我们的分支更加混乱。本着兔死狗烹鸟尽弓藏的原则,杯酒释兵权~最后切换回iss53分支继续coding
1 | $ git branch -d hotfix |
Basic Merging
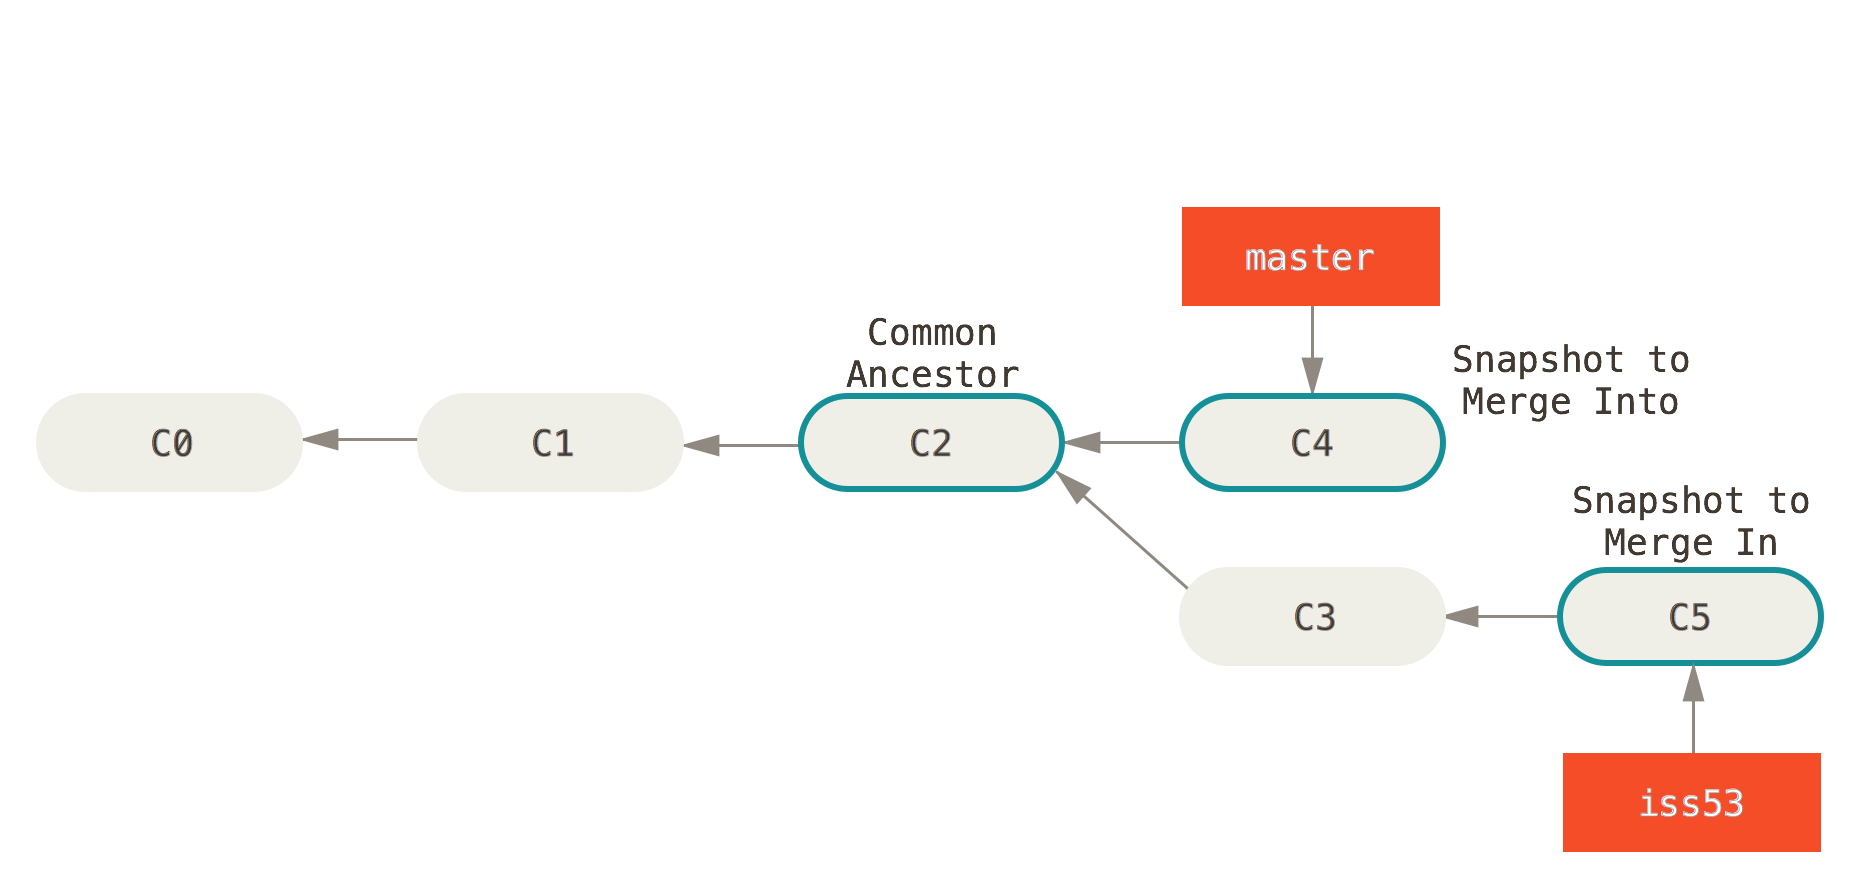
现在我们完成了iss53的功能开发与测试,需要将代码合并回master,以备后续上线。当然,需要先切回master,然后使用git merge来合并iss53分支。
1 | $ git checkout master |
合并前
合并后
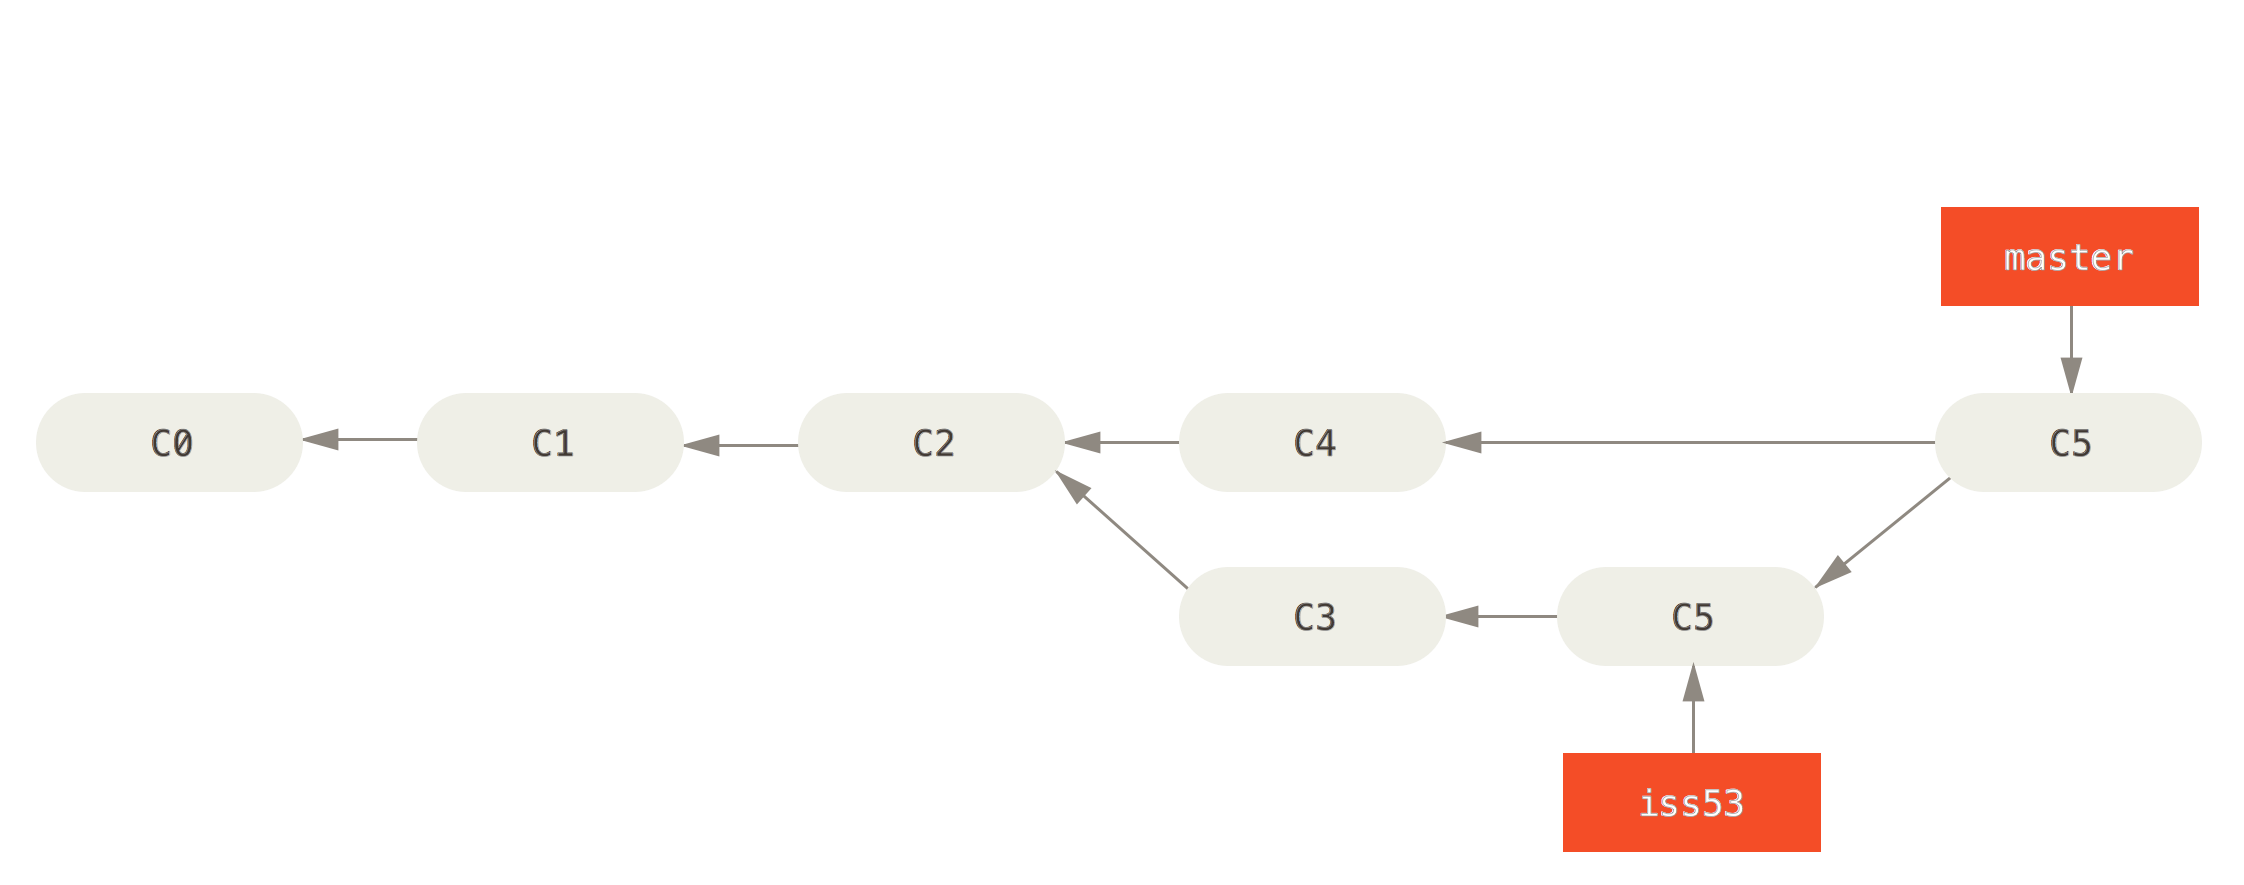
从图上可以看出来,Git基于master与iss53的提交历史,新创建了一个commit-C6,图中此处有误,最右边master指向的应该为C6。惯例,卸磨杀驴。
1 | $git branch -d iss53 |
Basic Merge Conflicts
在并行开发的过程中,经常会遇到两个开发者同时修改了一个文件,在合并时发生冲突的场景,比如下面这样
1 | $ git merge iss53 |
使用git status查看当前合并进程与状态
1 | $ git status |
原来是index.html被分别修改了2次,导致git无法自动合并。使用编辑器或者IDE打开这个文件后,能看到
1 | <<<<<<< HEAD:index.html |
Git用非常容易识别的方式标示有冲突的代码:<<<<和====之间的是HEAD的改动(也就是master),====和>>>>之间的是另一个分支(iss53)的改动,保留想保留的即可。
如果喜欢图形化的界面,使用git mergetool来打开,Git默认的是opendiff。
修改完成后,文件处于modified状态,需要先用add将其变为staged,然后在commit中注明这次merge。
Branch Management
查看本地branch,使用git branch,增加-r参数以查看远端仓库branch,增加-v参数查看最新一次的commit
1 | $ git branch |
如果你想看哪些分支已经被merge进了HEAD中,用--merged,前面没有星号*的分支是可以用git branch -d删除的。
1 | $ git branch --merged |
查看没有merge的分支,用--no-merged参数。对于这样的分支,当你试图使用git branch -d进行删除时,Git会给出提示,告诉你这样的操作不被允许。(你可以使用git branch -D来强制删除)
1 | $ git branch --no-merged |
Remote Branches
对于远端仓库的每一个分支,本地都有一个与其对应的分支,用(remote)/(branch)来表示,比如origin/master。通常我们看到remote的名字是origin,但这不是固定的,你可以用以下命令来更改这个名字git clone -o booyah,这样你创建的就是booyah/master。
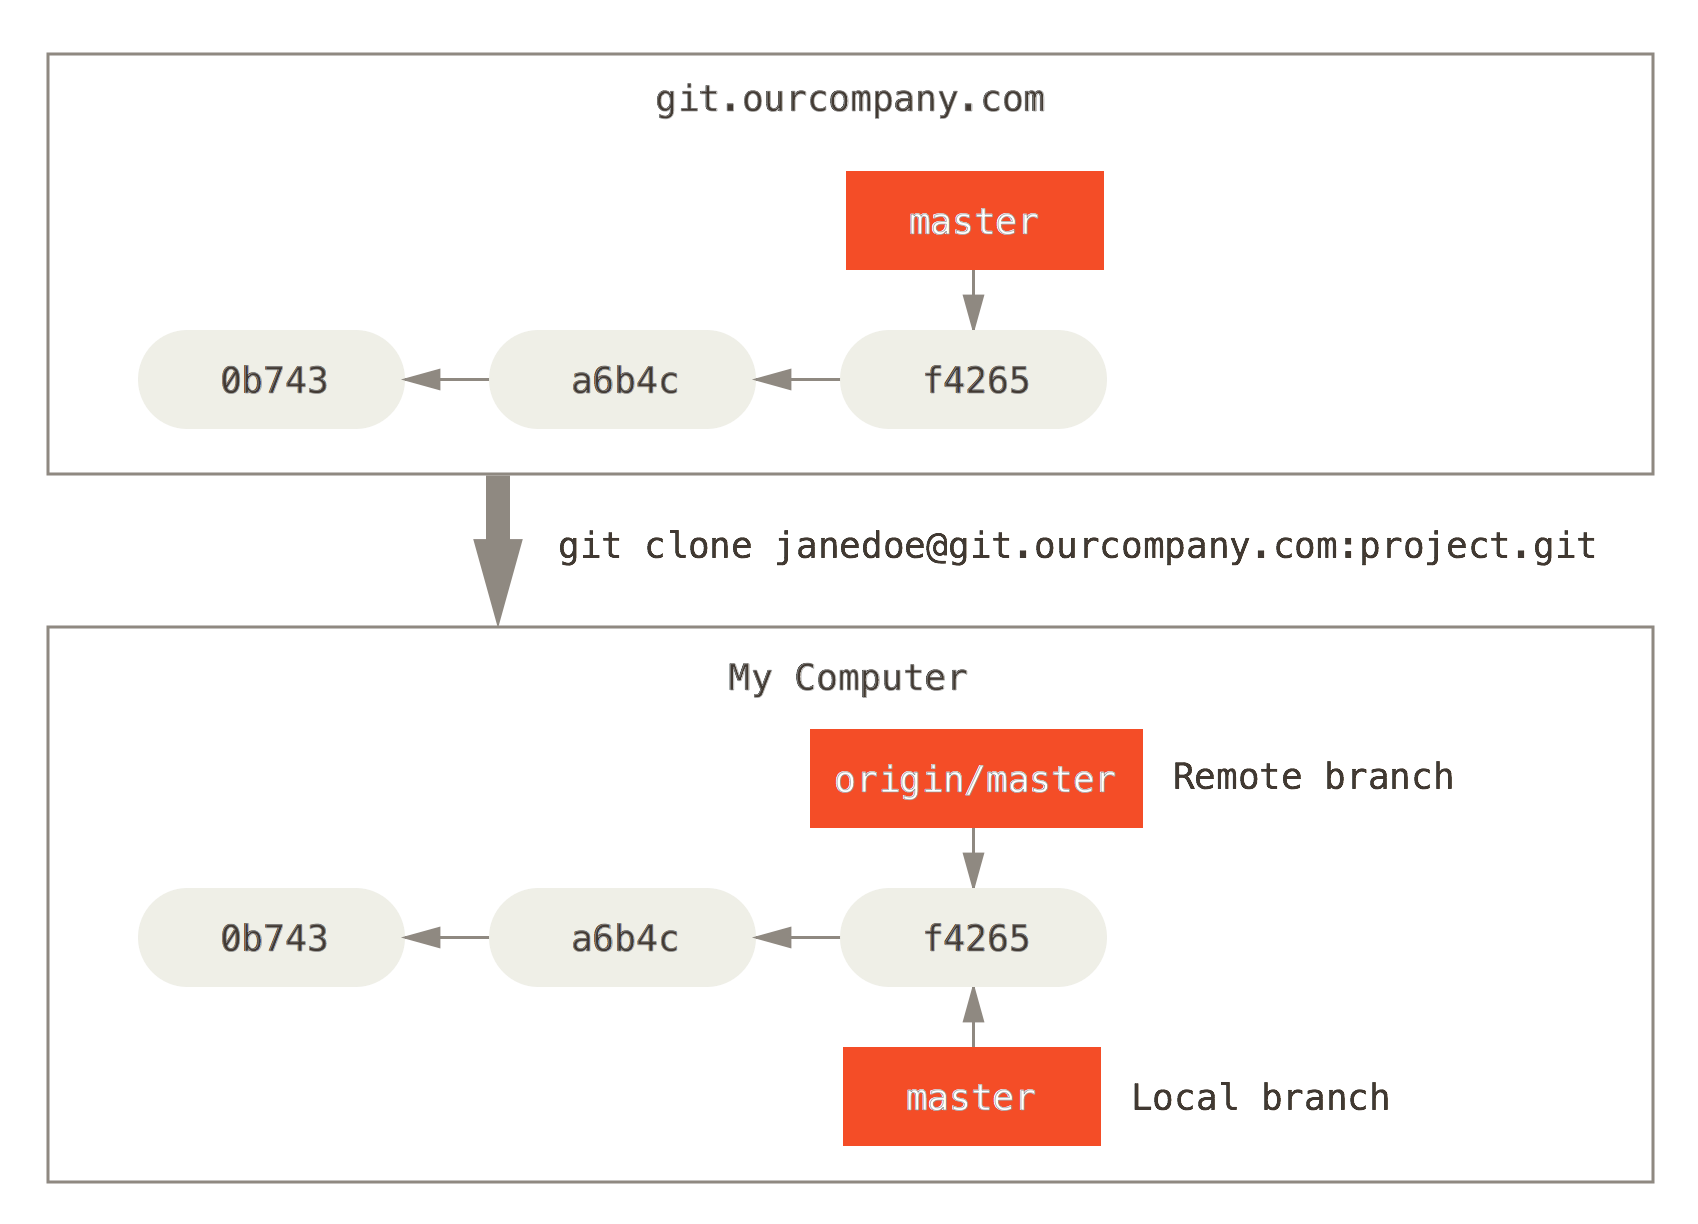
最开始clone并checkout时,origin/master与master指向同一个snapshot
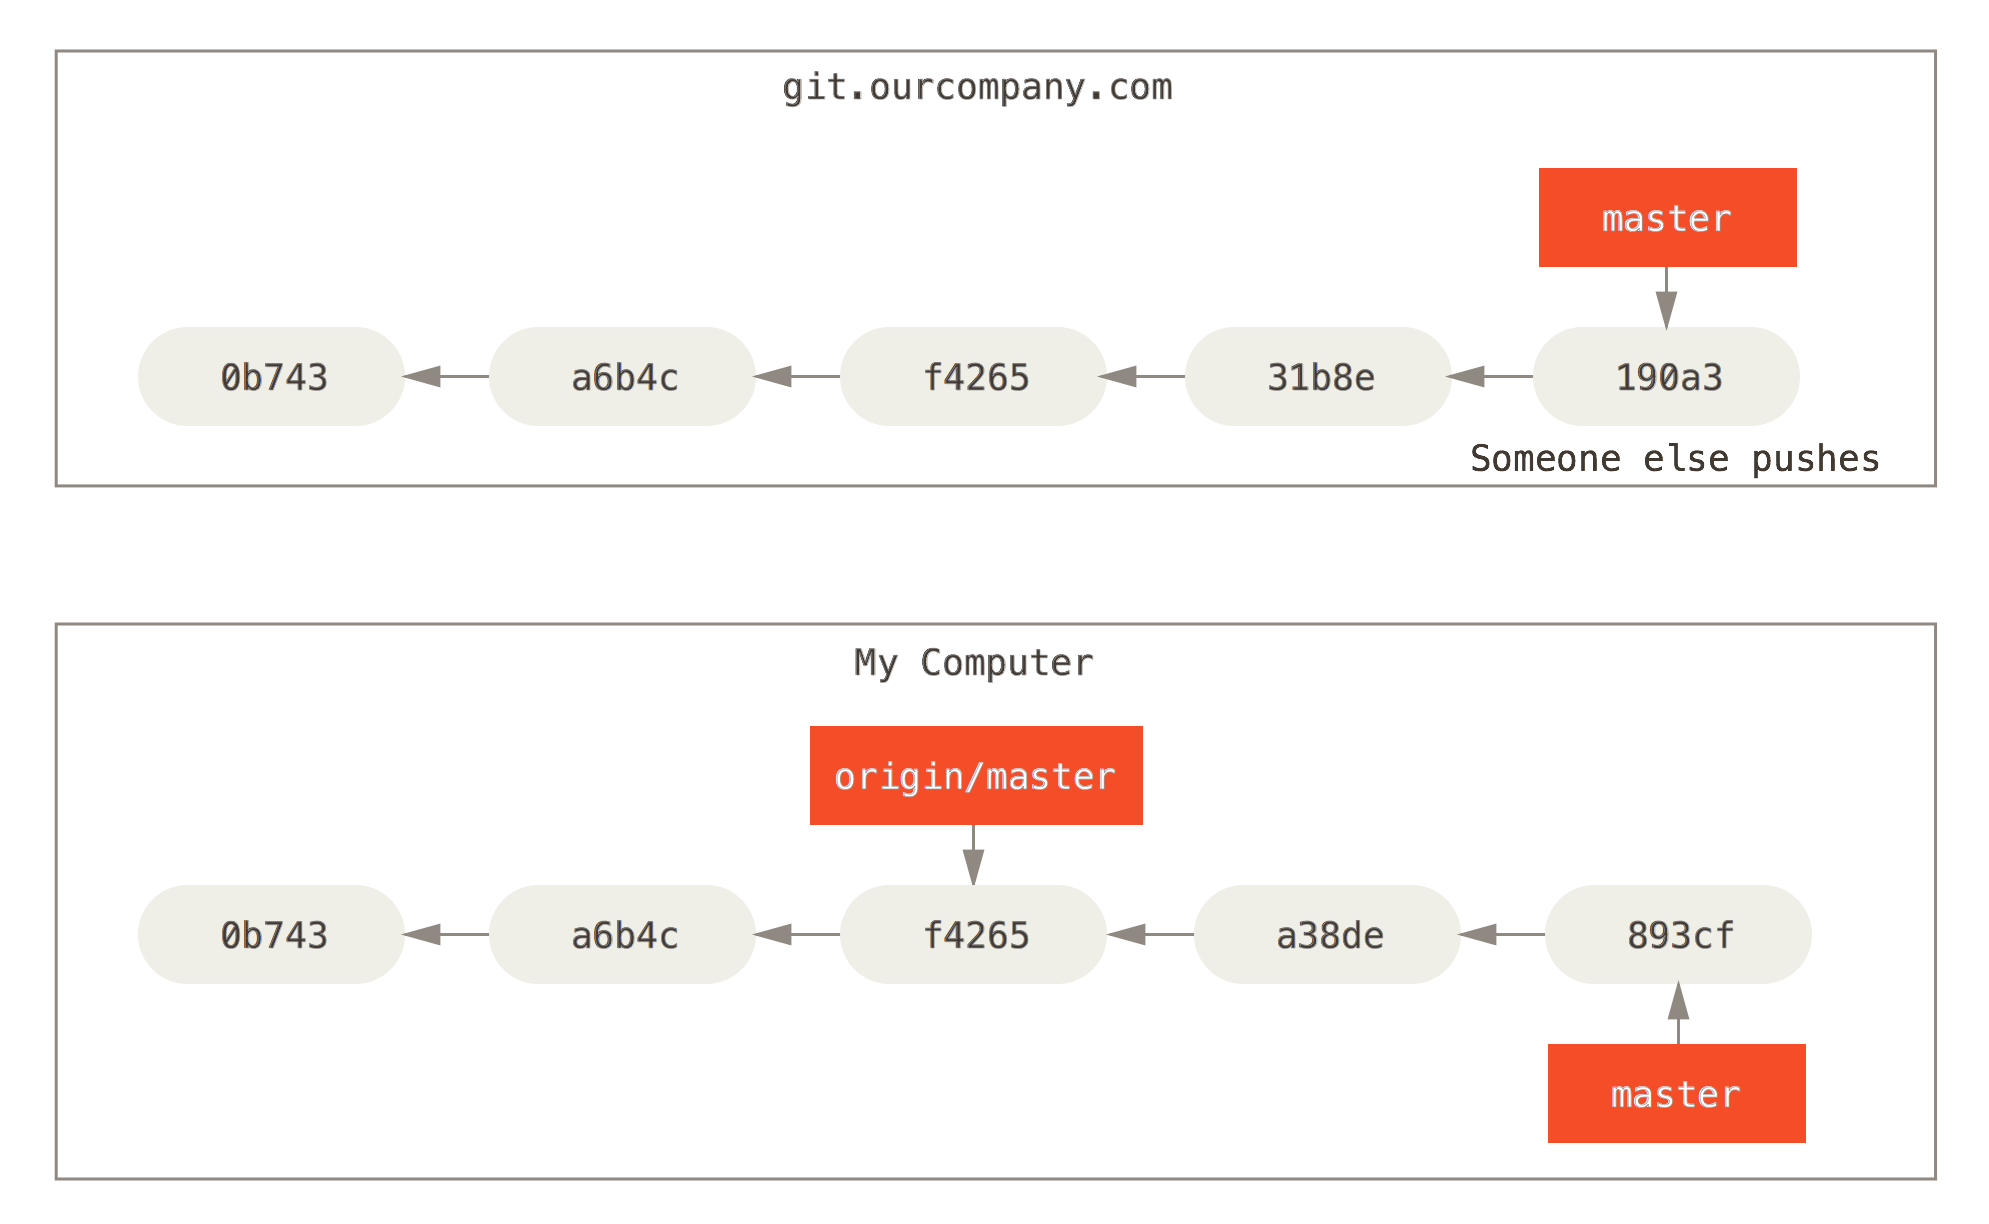
只要不fetch,origin/master指向的位置就不会变更,master分支会随着commit一直向前。
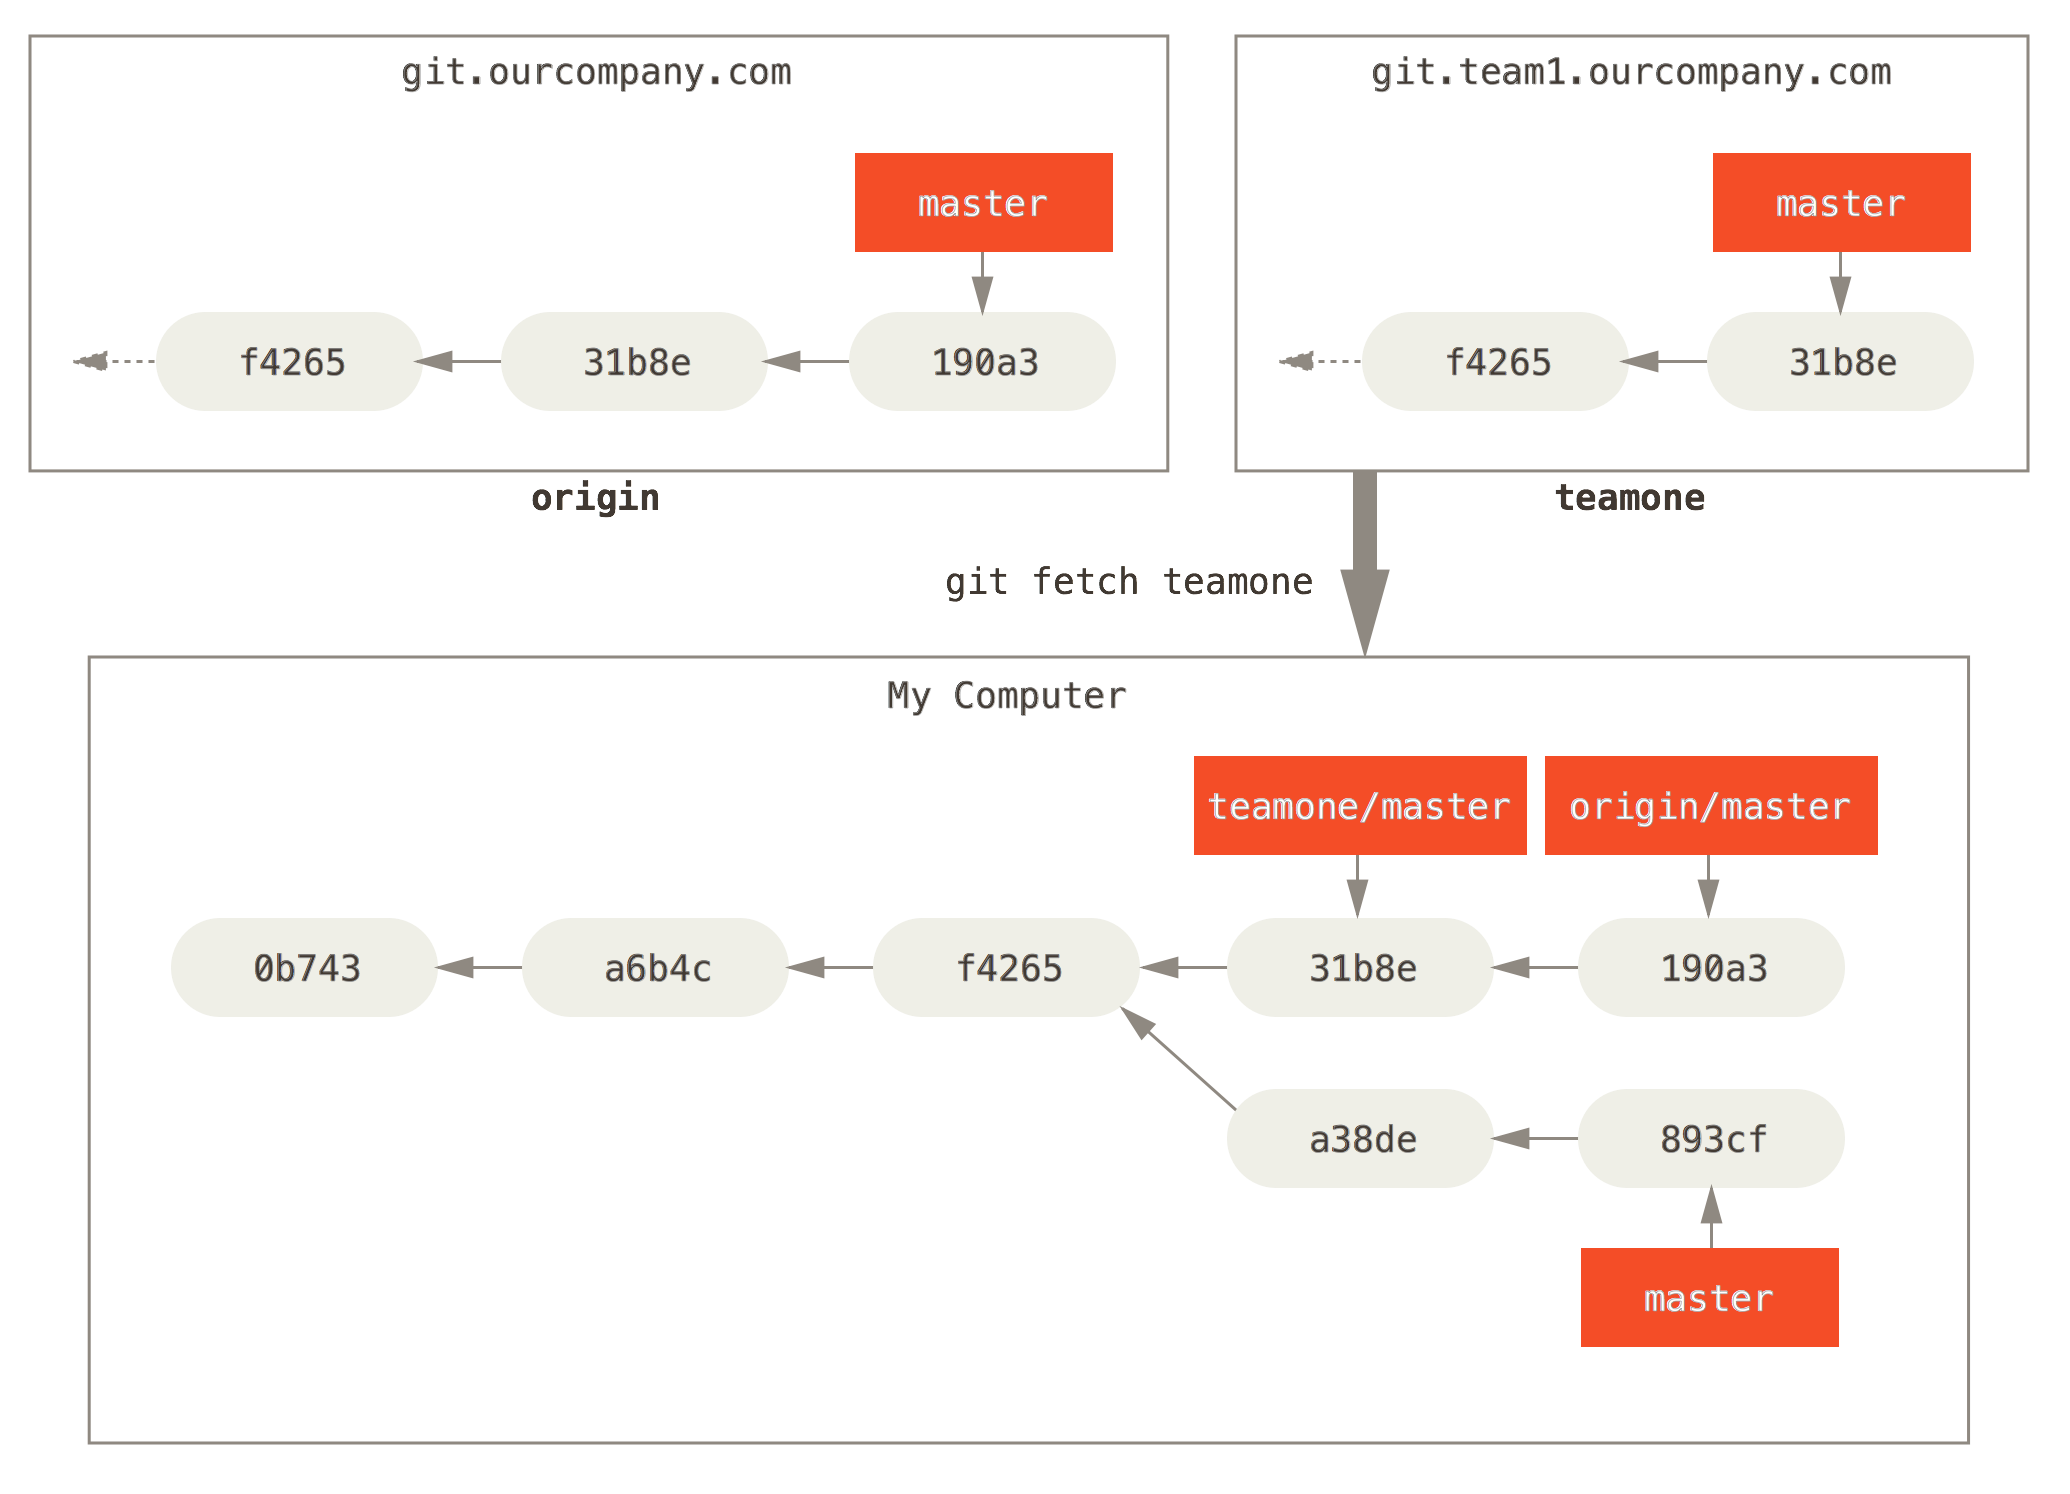
也可以把两个remote的历史都拉下来,酌情使用
Pushing
使用git push <remote> <branch>来push到远端仓库。
1 | $ git push origin serverfix |
这其实是一个缩写,背后完整的命令是git push origin refs/heads/serverfix:refs/heads/serverfix,直接引用原文
which means, “Take my serverfix local branch and push it to update the remote’s serverfix branch.”
分支名前面的refs/heads是Git内部机制,你也可以省略这个路径,写作serverfix:serverfix,或者你觉得在remote端不希望叫serverfix的名字,那就改一个你喜欢的!git push origin serverfix:awesomebranch
使用git checkout -b <branch_name> <remote>/<branch_name>来创建一个基于远端的本地分支,这种分支被叫做tracking branch,被跟踪的那个远端branch叫做upstream branch。有了这层关系在里面,当你进行pull/push时,Git就自然知道要操作哪一个分支了。
由于git checkout -b <branch_name> <remote>/<branch_name>实在是太常用了,Git为它提供了一个缩写git checkout --track <remote>/<branch>
1 | $ git checkout --track origin/serverfix |
甚至,Git提供了一个缩写的缩写:git checkout <branch>,这个命令要求本地分支与远程分支保持名字一致。
1 | $ git checkout serverfix |
如果尚未给本地的一个分支指定远端分支,使用-u参数
1 | $ git branch -u origin/serverfix |
小技巧:可以用{@u}或者@{upstream}来代替upstream,比如当你处在master分支时,可以用git merge @{u}来代替git merge origin/master
如果你想了解本地分支的track情况(分支、ahead、behind),使用git branch -vv,记得先git fetch --all
1 | $ git branch -vv |
Pulling
相比于fetch把远端分支更新到本地,pull命令更进了一步,完成了merge的功能。
pull = fetch + merge。笔者赞同书中的观点,还是单独使用fetch&merge的好。
Generally it’s better to simply use the
fetchandmergecommands explicitly as the magic ofgit pullcan often be confusing.
Deleting Remote Branches
使用git push origin --delete <branch_name>来删除服务器上的某个分支
1 | $ git push origin --delete serverfix |
还有一种写法,git push origin :<branch_name>,能起到同样的作用
1 | $ git push origin :feature/8.0.0_bugfix_leili |
记住,所删除的“分支”本质上只是“指针”,所有的代码snapshot依旧保存在服务器上,可以随时check出来
Rebasing
接下来我们来学习与Merge分庭抗礼的另一个强有力的功能——Rebase。两者同是将不同分支上的提交合并到一起的功能,它们之间的区别是什么样的呢?容笔者细细道来。
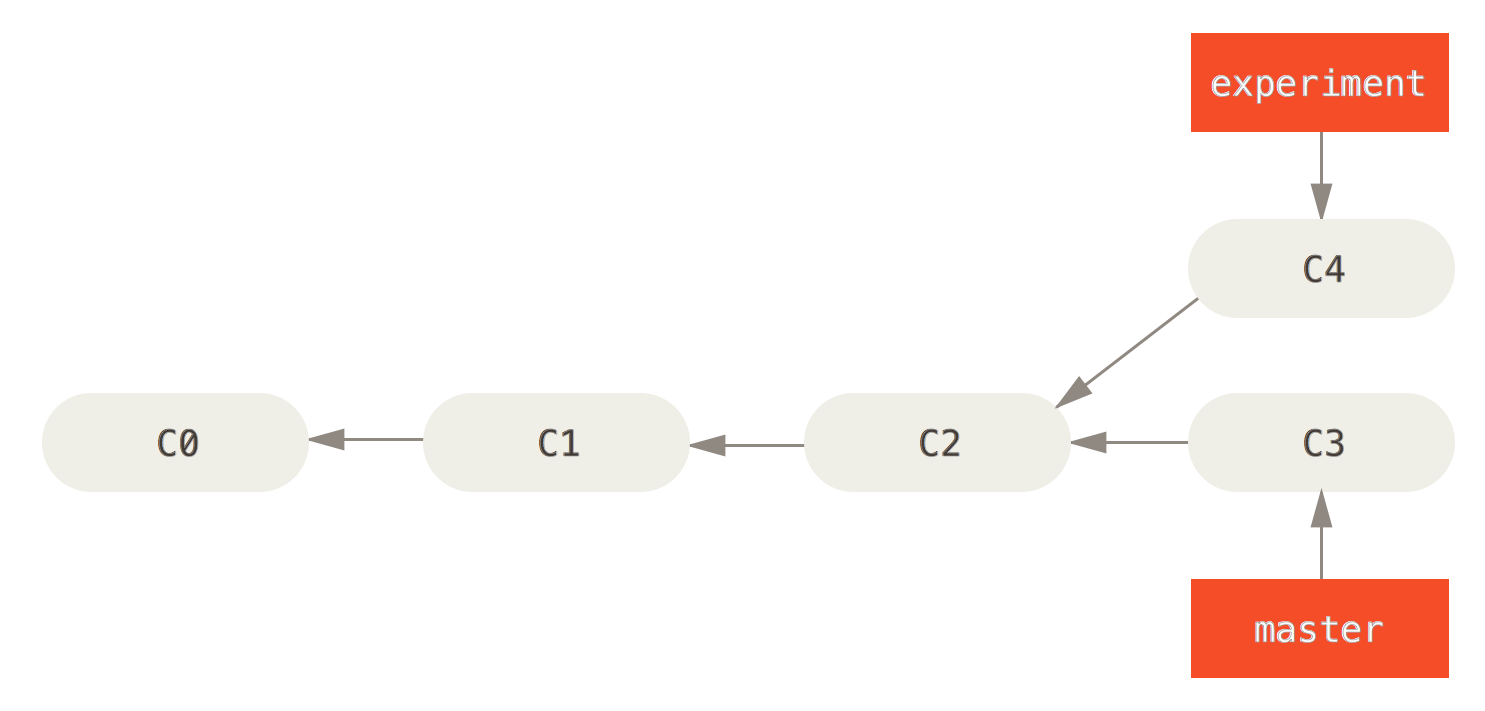
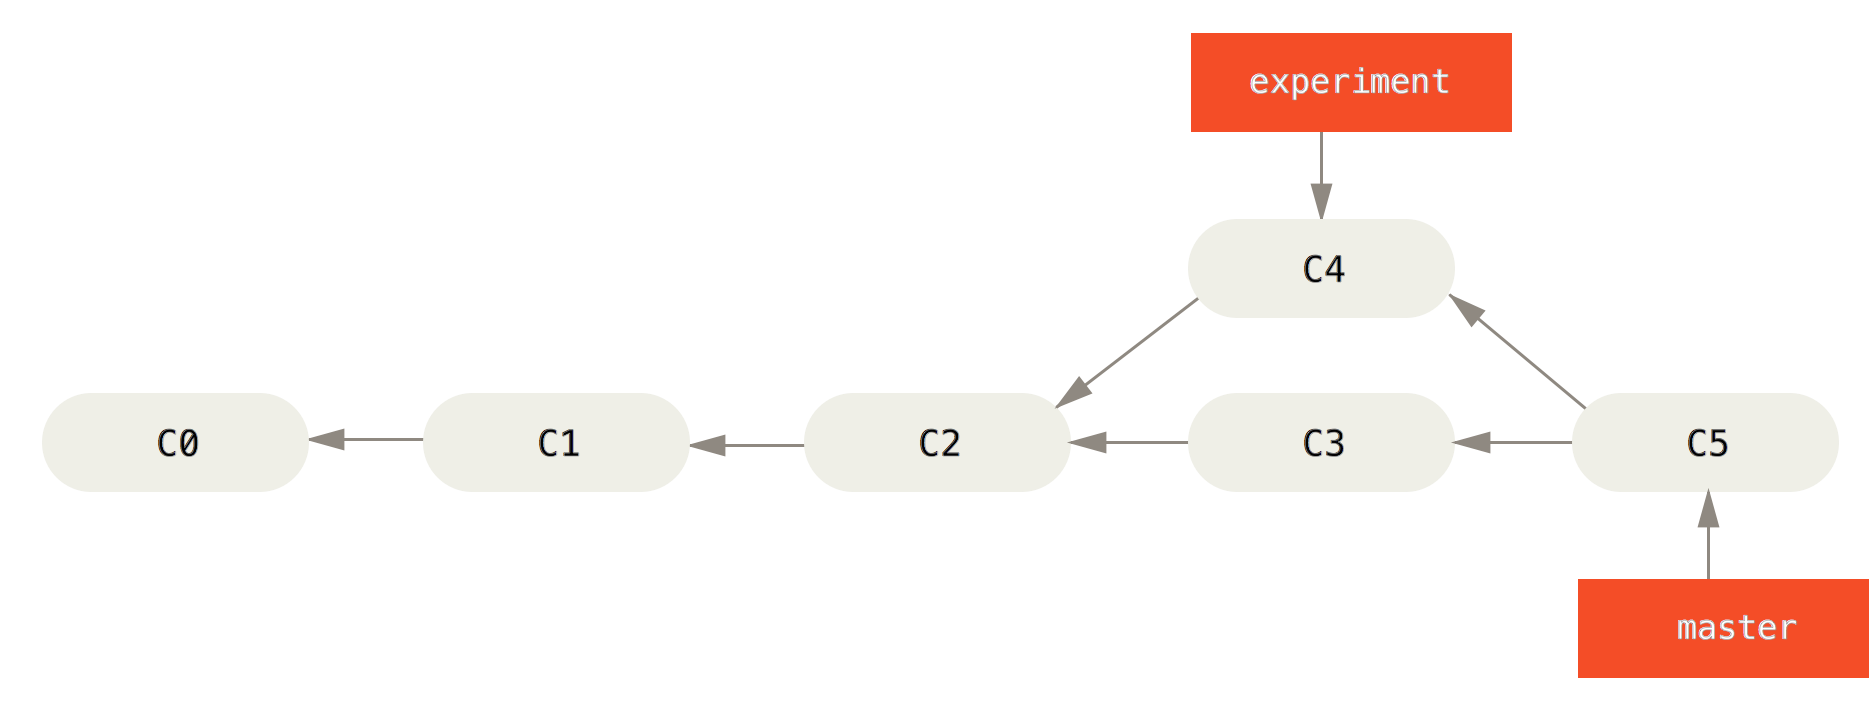
首先来看一个熟悉的场景,有master和experiment两个分支,对merge而言,如果在master分支的基础上,对experiment进行merge,Git会创建一个新的commit(C5),包含了两个分支最近的共同祖先(C2)以来发生的所有变更(C4和C3),最后把master的指针指向C5
而对于rebase,我们这么操作。注意HEAD指向的是experiment分支。
1 | $ git checkout experiment |
非常神奇地,C4这个commit消失了!!!,取而代之,Git在C3后面创建了C4’,同时将experiment的指针转移到了这里。整个提交历史变成了一根直线,清爽了许多。

接下来,我们让master move forward,以合并experiment带来的改动。
1 | $ git checkout master |

注意!虽然merge与rebase看起来都是把两个分支上的改动合并到一起,但一个是“同时合并A和B”,一个是“将A合并到B”,仔细体会其中的不同。
Rebasing replays changes from one line of work onto another in the order they were introduced, whereas merging takes the endpoints and merges them together.
有趣的Rebasing
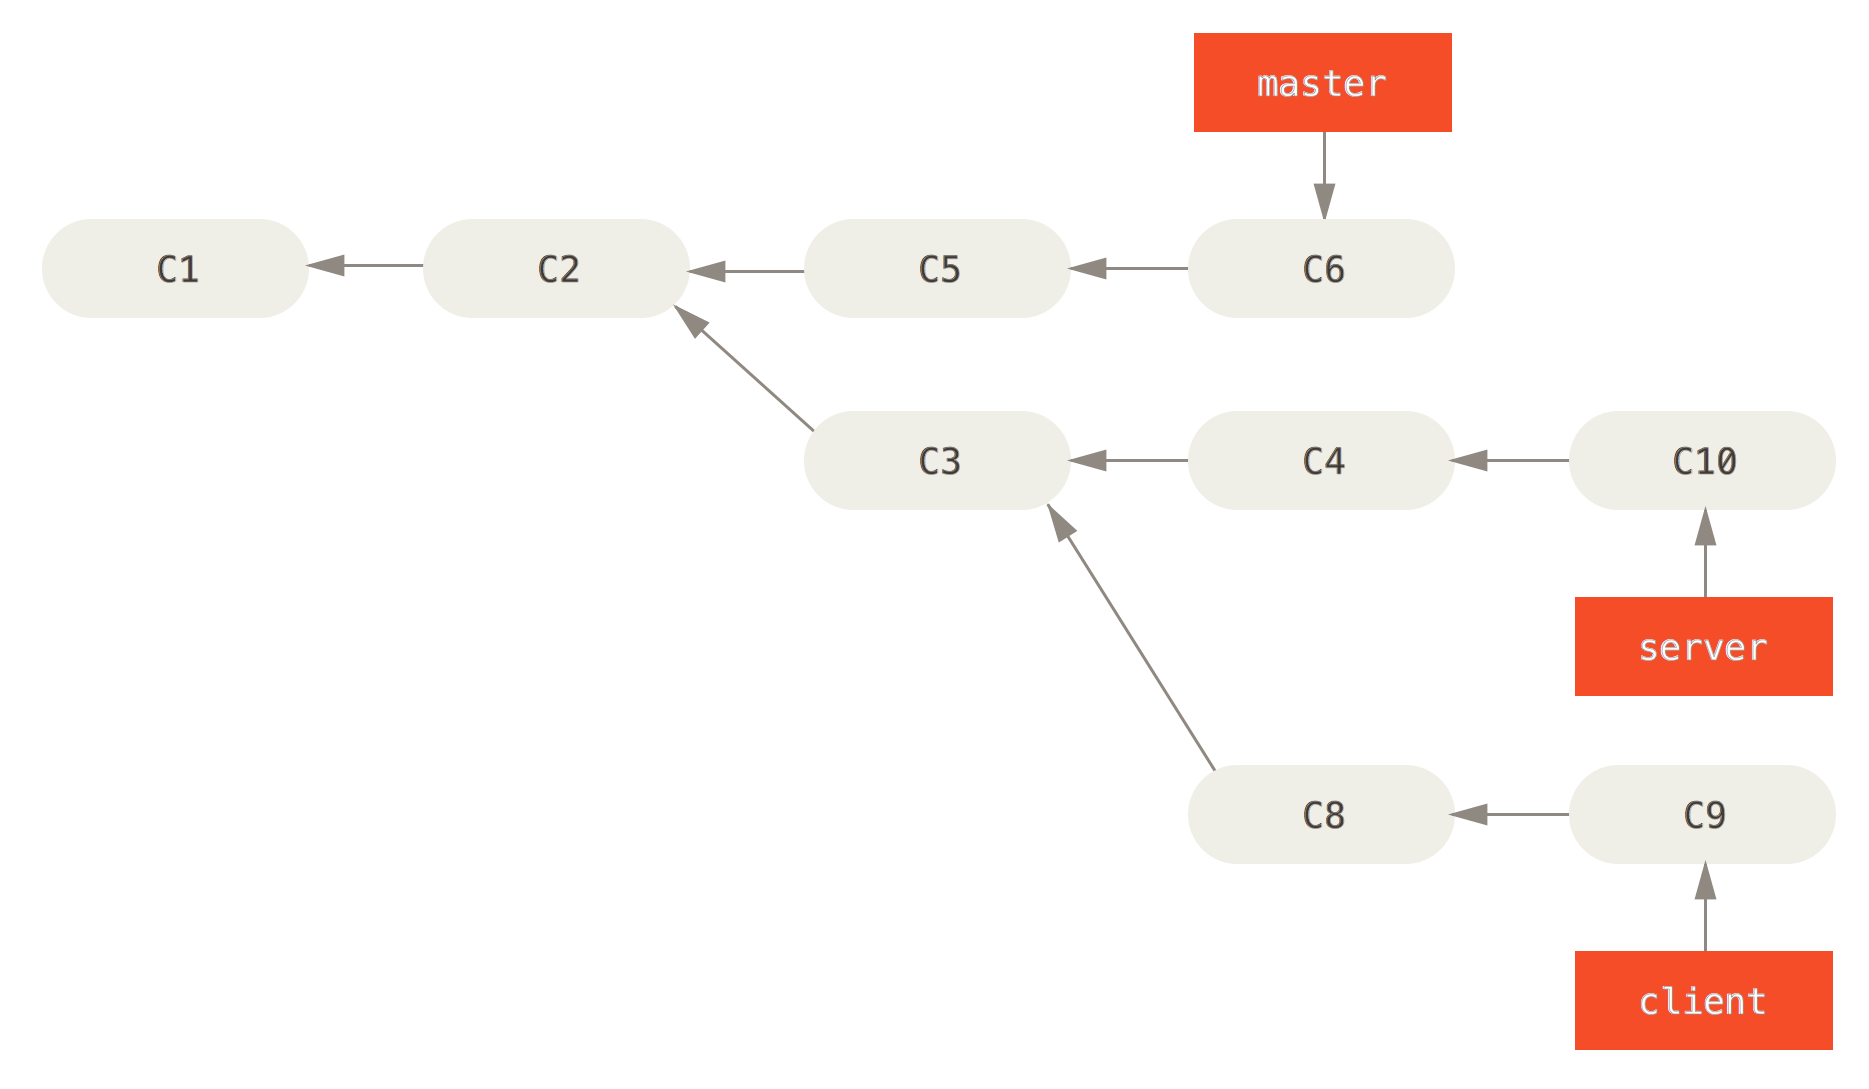
想象上面一个场景,对于master server client三个分支,如果我想要将client上的改动提交到master(C8和C9),而暂时不想合并server上的代码,应该怎么做?
1 | $ git checkout cient |
上述这样肯定不行,因为会把C3带过去。
针对这种场景,Git也为我们提供了这个功能
1 | $ git rebase --onto master server client |
是不是有点一头雾水?这都什么鬼啊!别急,我们来仔细看看这段指令。
This basically says, “Check out the client branch, figure out the patches from the common ancestor of the
clientandserverbranches, and then replay them ontomaster.”
明白了吧!不过,虽然这看上去很神奇,笔者可不希望在实际的工作中碰到这种复杂的场景。
Rebase后的提交历史如图:

接下来该怎么做,相信不用我说,你也知道了——把master fast forward过去~
1 | $ git checkout master |
当你完成了server分支的开发,狠狠地用rebase把它甩在master脸上吧,git rebase [basebranch] [topicbranch]——将topicbranch上的改动在basebranch上重放(checks out the topic branch (in this case, server) for you and replays it onto the base branch (master))
1 | $ git rebase master server |
删除无用分支后,最终得到一个无比清爽的提交记录

Rebase的风险
Rebase是一个无比强大的工具,借助它,我们可以将项目提交历史梳理成一条直线,然而,如果应用不当,它产生的麻烦要远远大于带来的好处。
Do not rebase commits that exist outside your repository.
简单的说,如果一个commit已经被公布给其他人使用,那就不要试图再rebase它。如果你遵守了这条准则,一切安好;可一旦你违反了他,你的同事将会恨你入骨……下面用几张图来说明这种深刻仇恨的来源
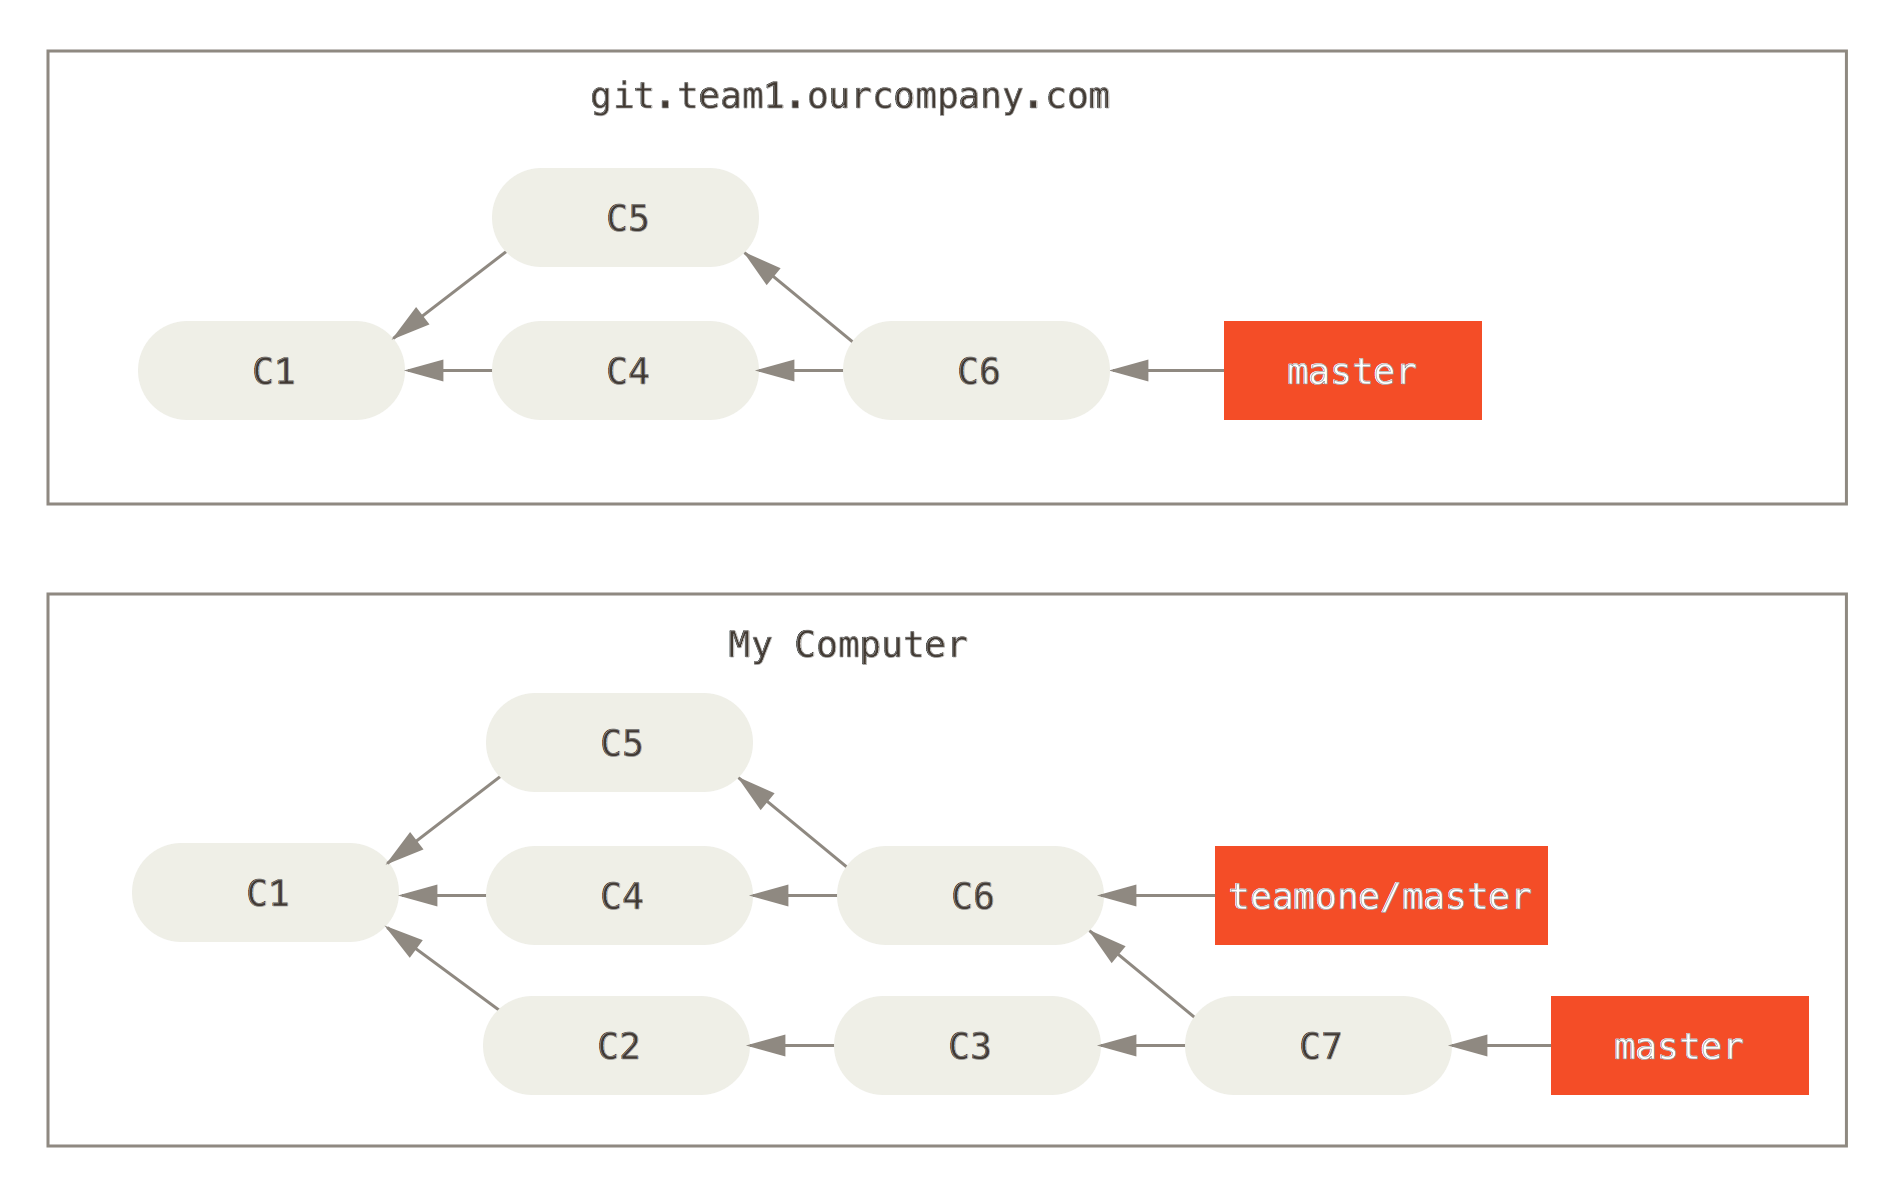
首先是一个简单的分支模型,teamone和你正在合作中,显然你的工作效率更高些,已经提交了C2、C3两次
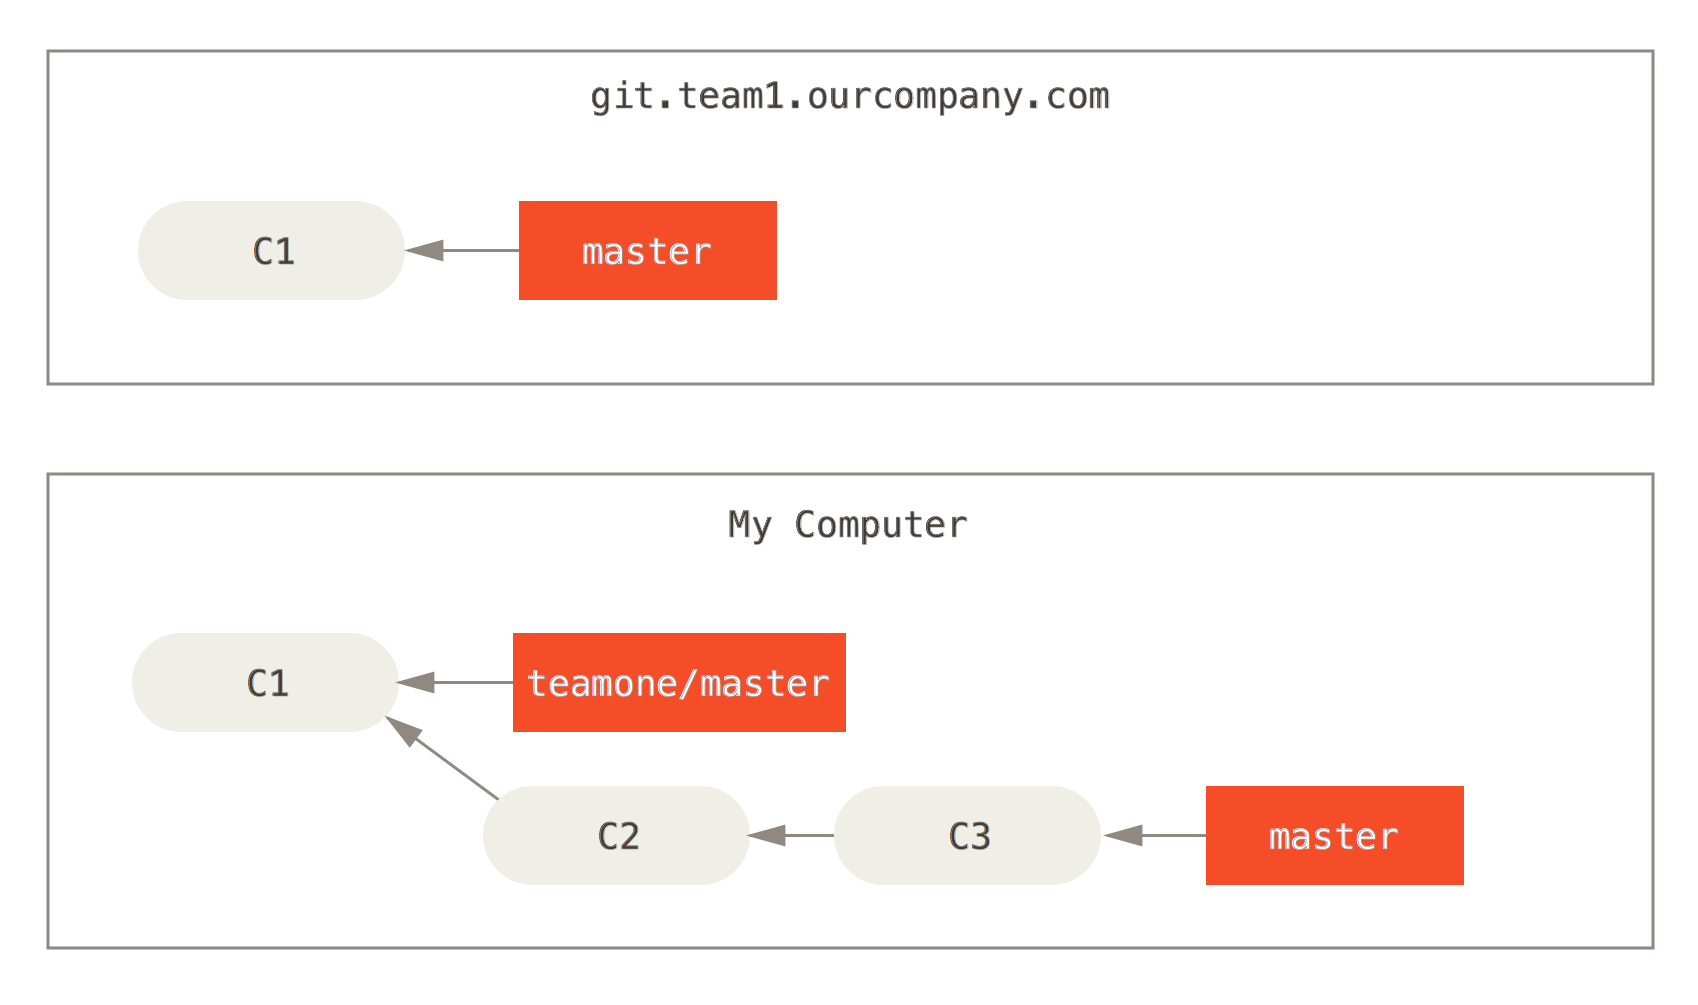
远端仓库也有一些更新,而且他们用到了merge,真是厉害啊!你当然不甘示弱,立即把他们的提交merge了过来。
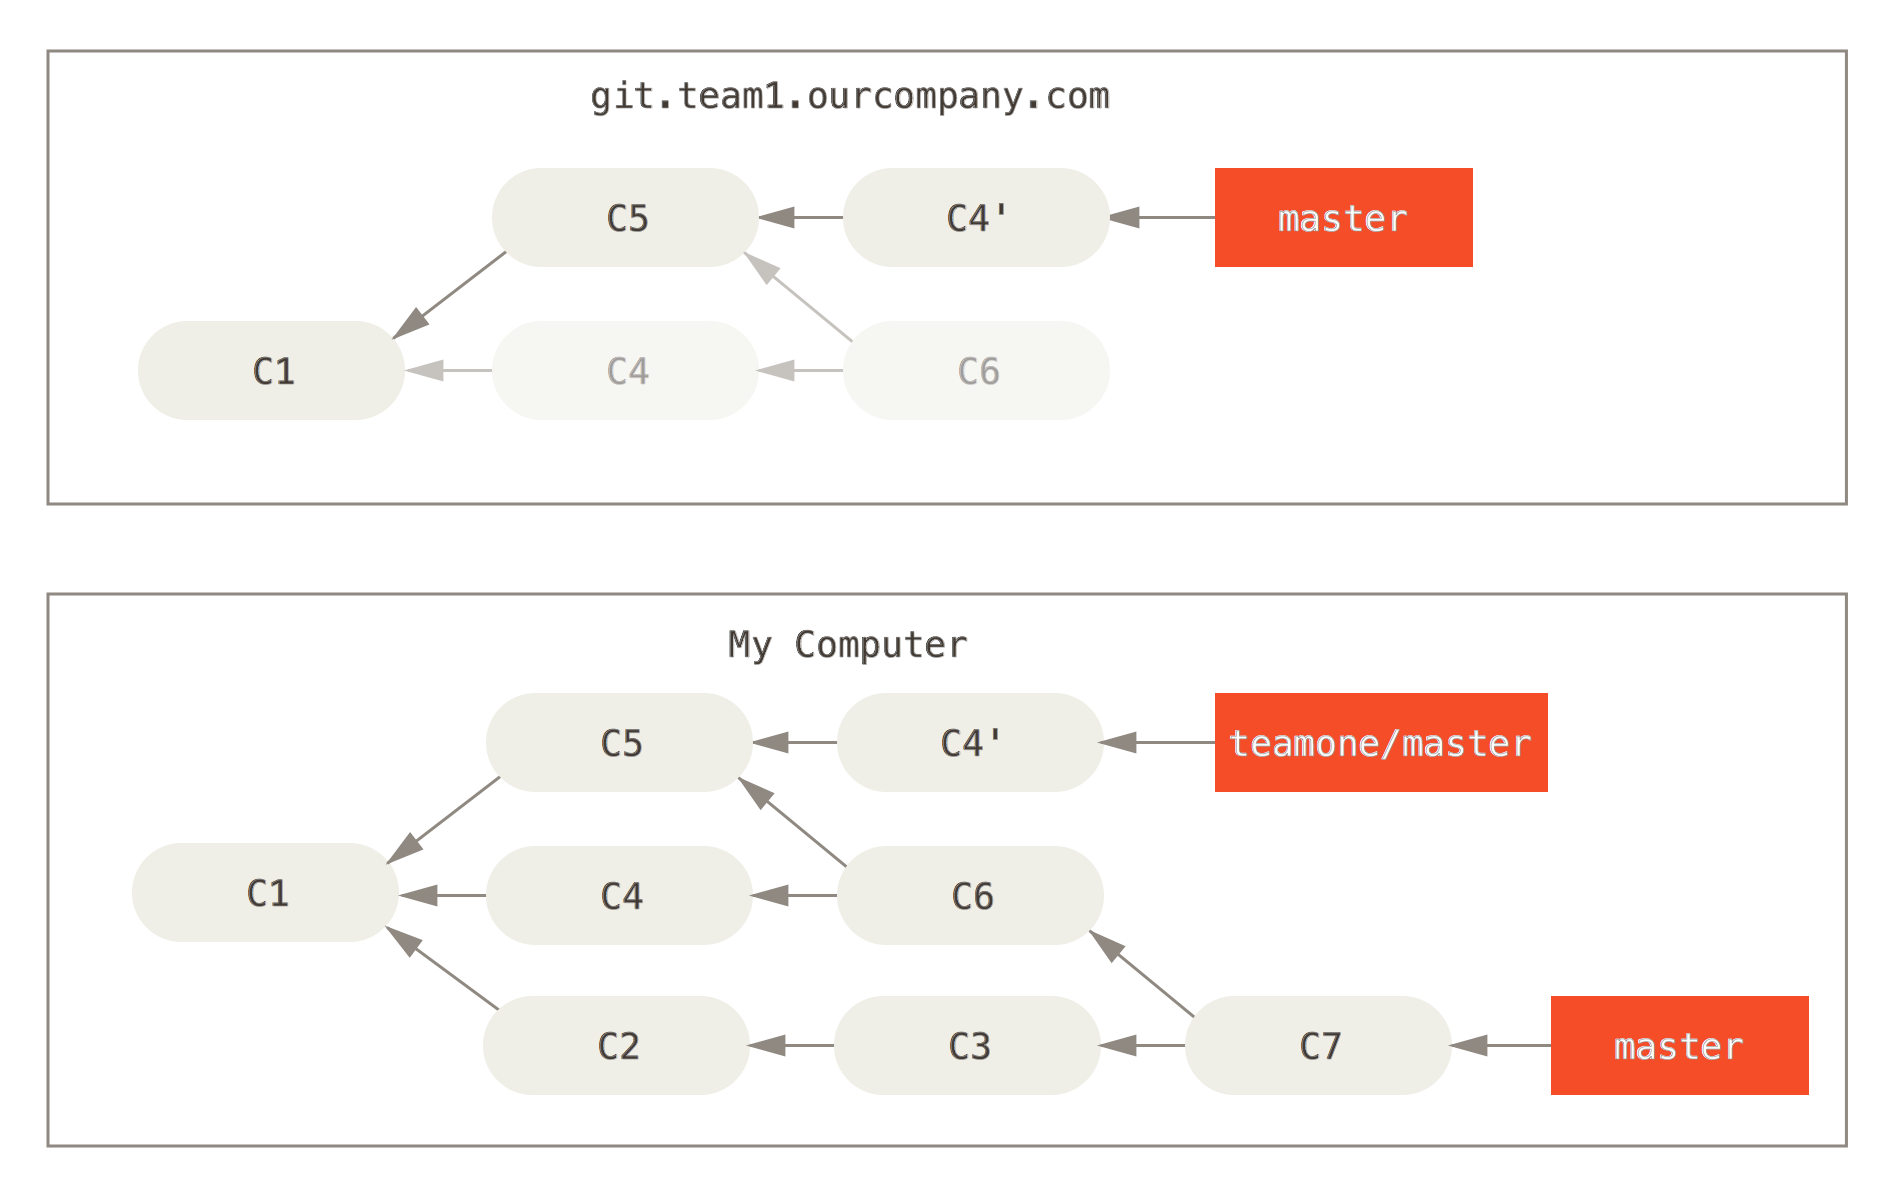
这时,远端team发现merge不如rebase好用,他们使用非常邪恶的git push --force命令,覆盖掉了代码仓库中的历史,意图抹杀掉merge的出现。
天真的你并没有发现他们的邪恶企图,当你fetch时候,发现远端仓库有了更新,你自然想再merge一把,以保持最新代码
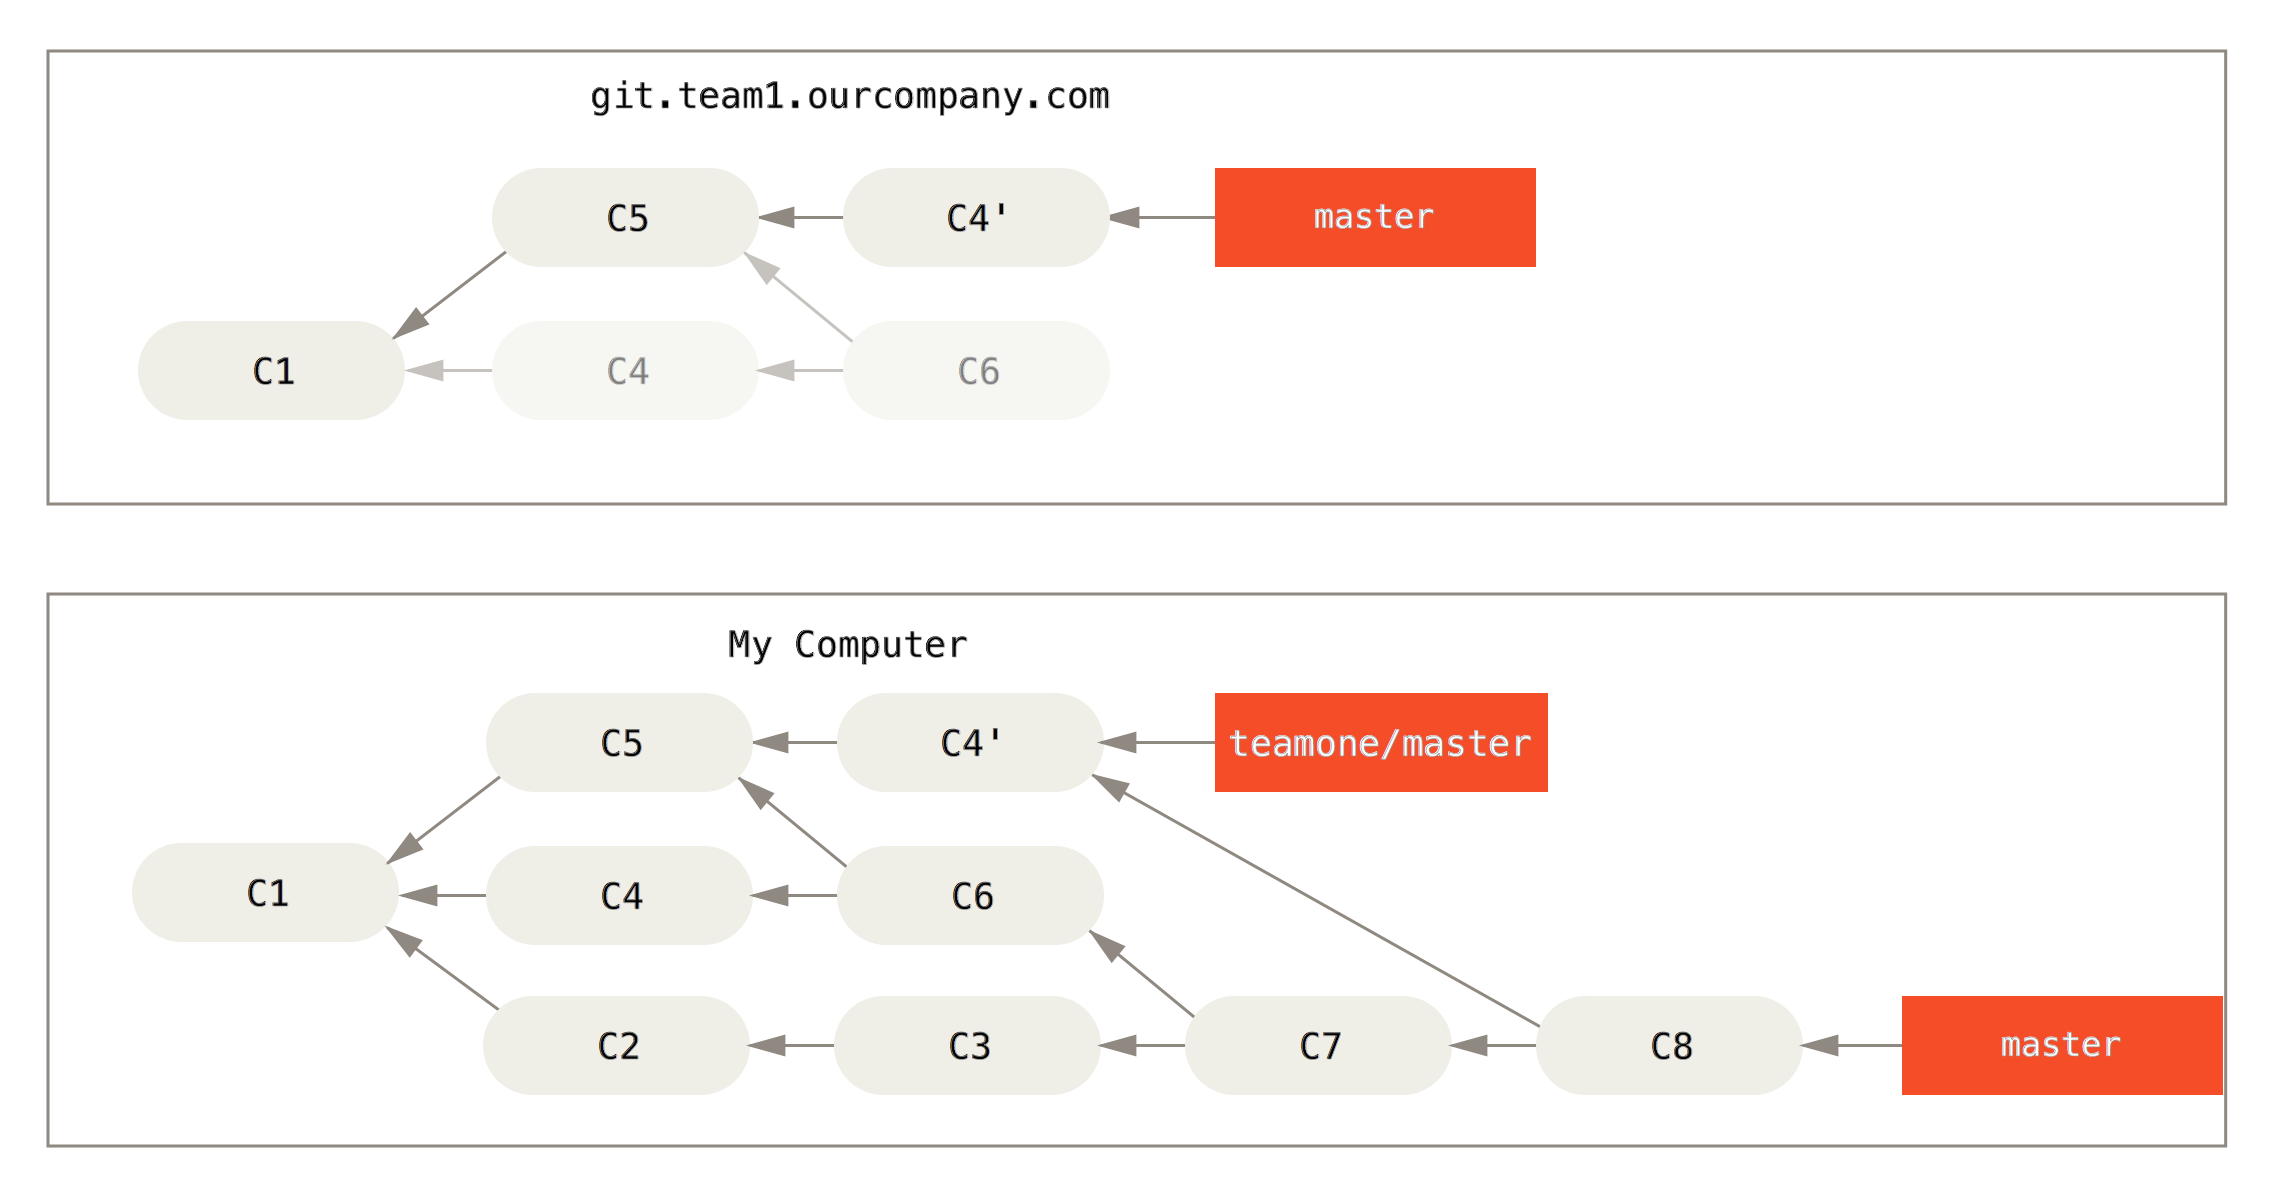
Boom!灾难发生了,由于C4和C4’实际上是一模一样的改动(实际上,如果你用git log来查看,你会发现这两个提交甚至有完全相同的author、date、message,当然他们的SHA1是不同的)。而且,就算你解决了冲突,把你的代码推送回远端时,邪恶的他们发现,原来让他们避之不及的C4和C6这两个提交——They are back!
Rebase When You Rebase
一旦出现了上面的情况,不要慌,Git为我们提供了解决这种问题的途径,那就是——Rebase!这时你checkout到自己的master分支上,执行git rebase teamone/master,Git会为你做以下事情(实在是懒得翻译了)
- Determine what work is unique to our branch (C2, C3, C4, C6, C7)
- Determine which are not merge commits (C2, C3, C4)
- Determine which have not been rewritten into the target branch (just C2 and C3, since C4 is the same patch as C4’)
- Apply those commits to the top of
teamone/master
最后得到如图的提交历史。需要注意,只有当C4和C4’几乎完全一致时,Git才会采取以上策略。不然,即使如上操作,依然会产生冲突。
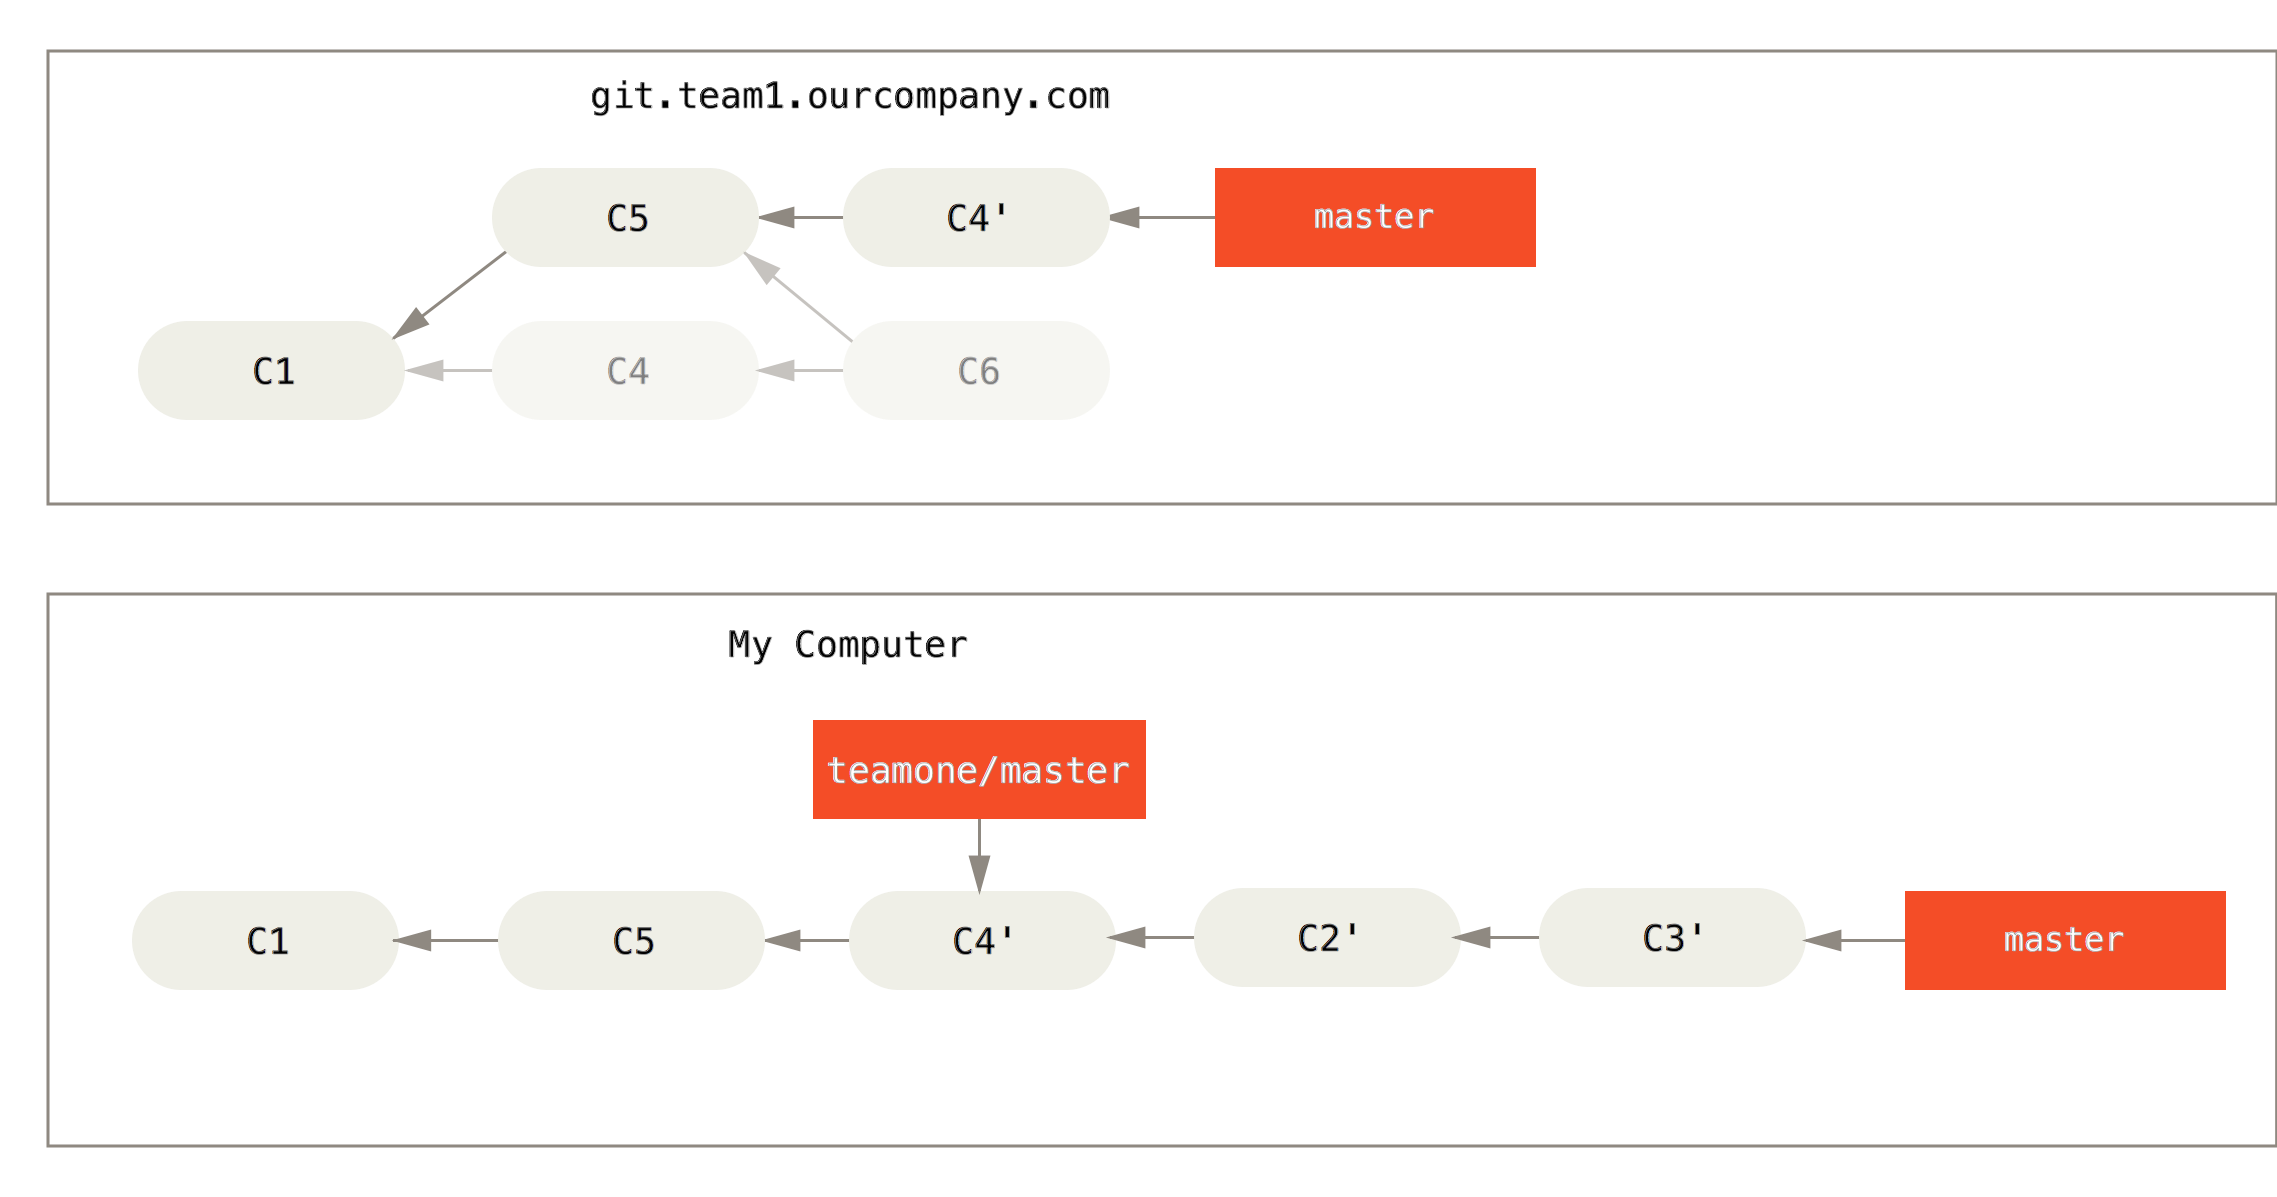
Rebase vs. Merge
关于Rebase和Merge该用哪个的问题,要因地制宜——Rebase可以极大简化提交历史,但它会篡改提交记录,而Merge可以原汁原味地保存每个人的提交时间与内容。应当记住,不论使用哪一个,都要按照基本法。
In general the way to get the best of both worlds is to rebase local changes you’ve made but haven’t shared yet before you push them in order to clean up your story, but never rebase anything you’ve pushed somewhere.